Primarettas: recap
Why I Think Hybrid 3D + AI Workflows Are the Future of CG

article translated from russian and formatted with chatGPT 5.3
Hi.
In this article, I want to talk about my Primarettas project: why I made it, how I made it, and, more importantly, how I see the future of CG workflows evolving from here.
A bit of background first.
I’ve been working professionally in game development since 2001, and I’ve been an artist the entire time. Early on I was more of a generalist, doing both concept art and 3D models. Over time I gradually specialized in character art. A few years ago I stopped drawing entirely and moved fully into 3D. These days I use 3D for prototyping, sketching ideas, concept work, and final models alike.
That matters because 3D, to me, is not one discipline. It is a broad and highly adaptable instrument.
When Stable Diffusion appeared in 2023, I saw the first real hint of a workflow that immediately grabbed my imagination: a hybrid of 3D and AI, where 3D carries the structural load of the image — composition, form, design — while the neural model handles rendering, surface treatment, and material richness.
As an experienced 3D artist, I know that getting a model to final visual quality is usually expensive. Not conceptually expensive — production expensive. Making a quick sculpt in ZBrush is relatively fast compared to what comes after: optimization, retopology, UVs, baking, texture compositing, material setup, lighting, rendering.
That is a huge amount of labor, and in many cases it is simply not justified.
What do I mean by that? If an artist runs a full photoreal character pipeline only to end up with a single static image, that is an obvious overinvestment of time and effort. In many cases the same problem can be solved faster and more intelligently through photobashing, image-based workflows, or neural tools.
My approach to 3D has always been pragmatic. I use 3D as a tool for achieving a specific end result. That end result might be a printable model, a game asset, a cinematic character, or a static turntable render. The goal defines the pipeline.
If a model is meant for 3D printing and will never leave ZBrush, then I do not need retopology. If a model will never be animated and only needs to exist in a static pose, then I do not need UVs and texture baking. That is exactly why I developed and wrote about a no-UV curvature workflow last year.
This project followed the same logic.
My goal was to produce high-quality, realistic character renders with a very specific and recognizable design language, and then use those characters later in AI animation. In practical terms, I wanted to do alone what would traditionally require a full character team: an art director, a concept artist, a character modeler, an animator, and a rendering artist.
That is the real premise of this article.
The Brief
The brief was simple and very deliberate.
First, model quality requirements were intentionally low. Form and design mattered more than technical purity. These models were never meant for traditional 3D animation. Their job was to look good in renders.
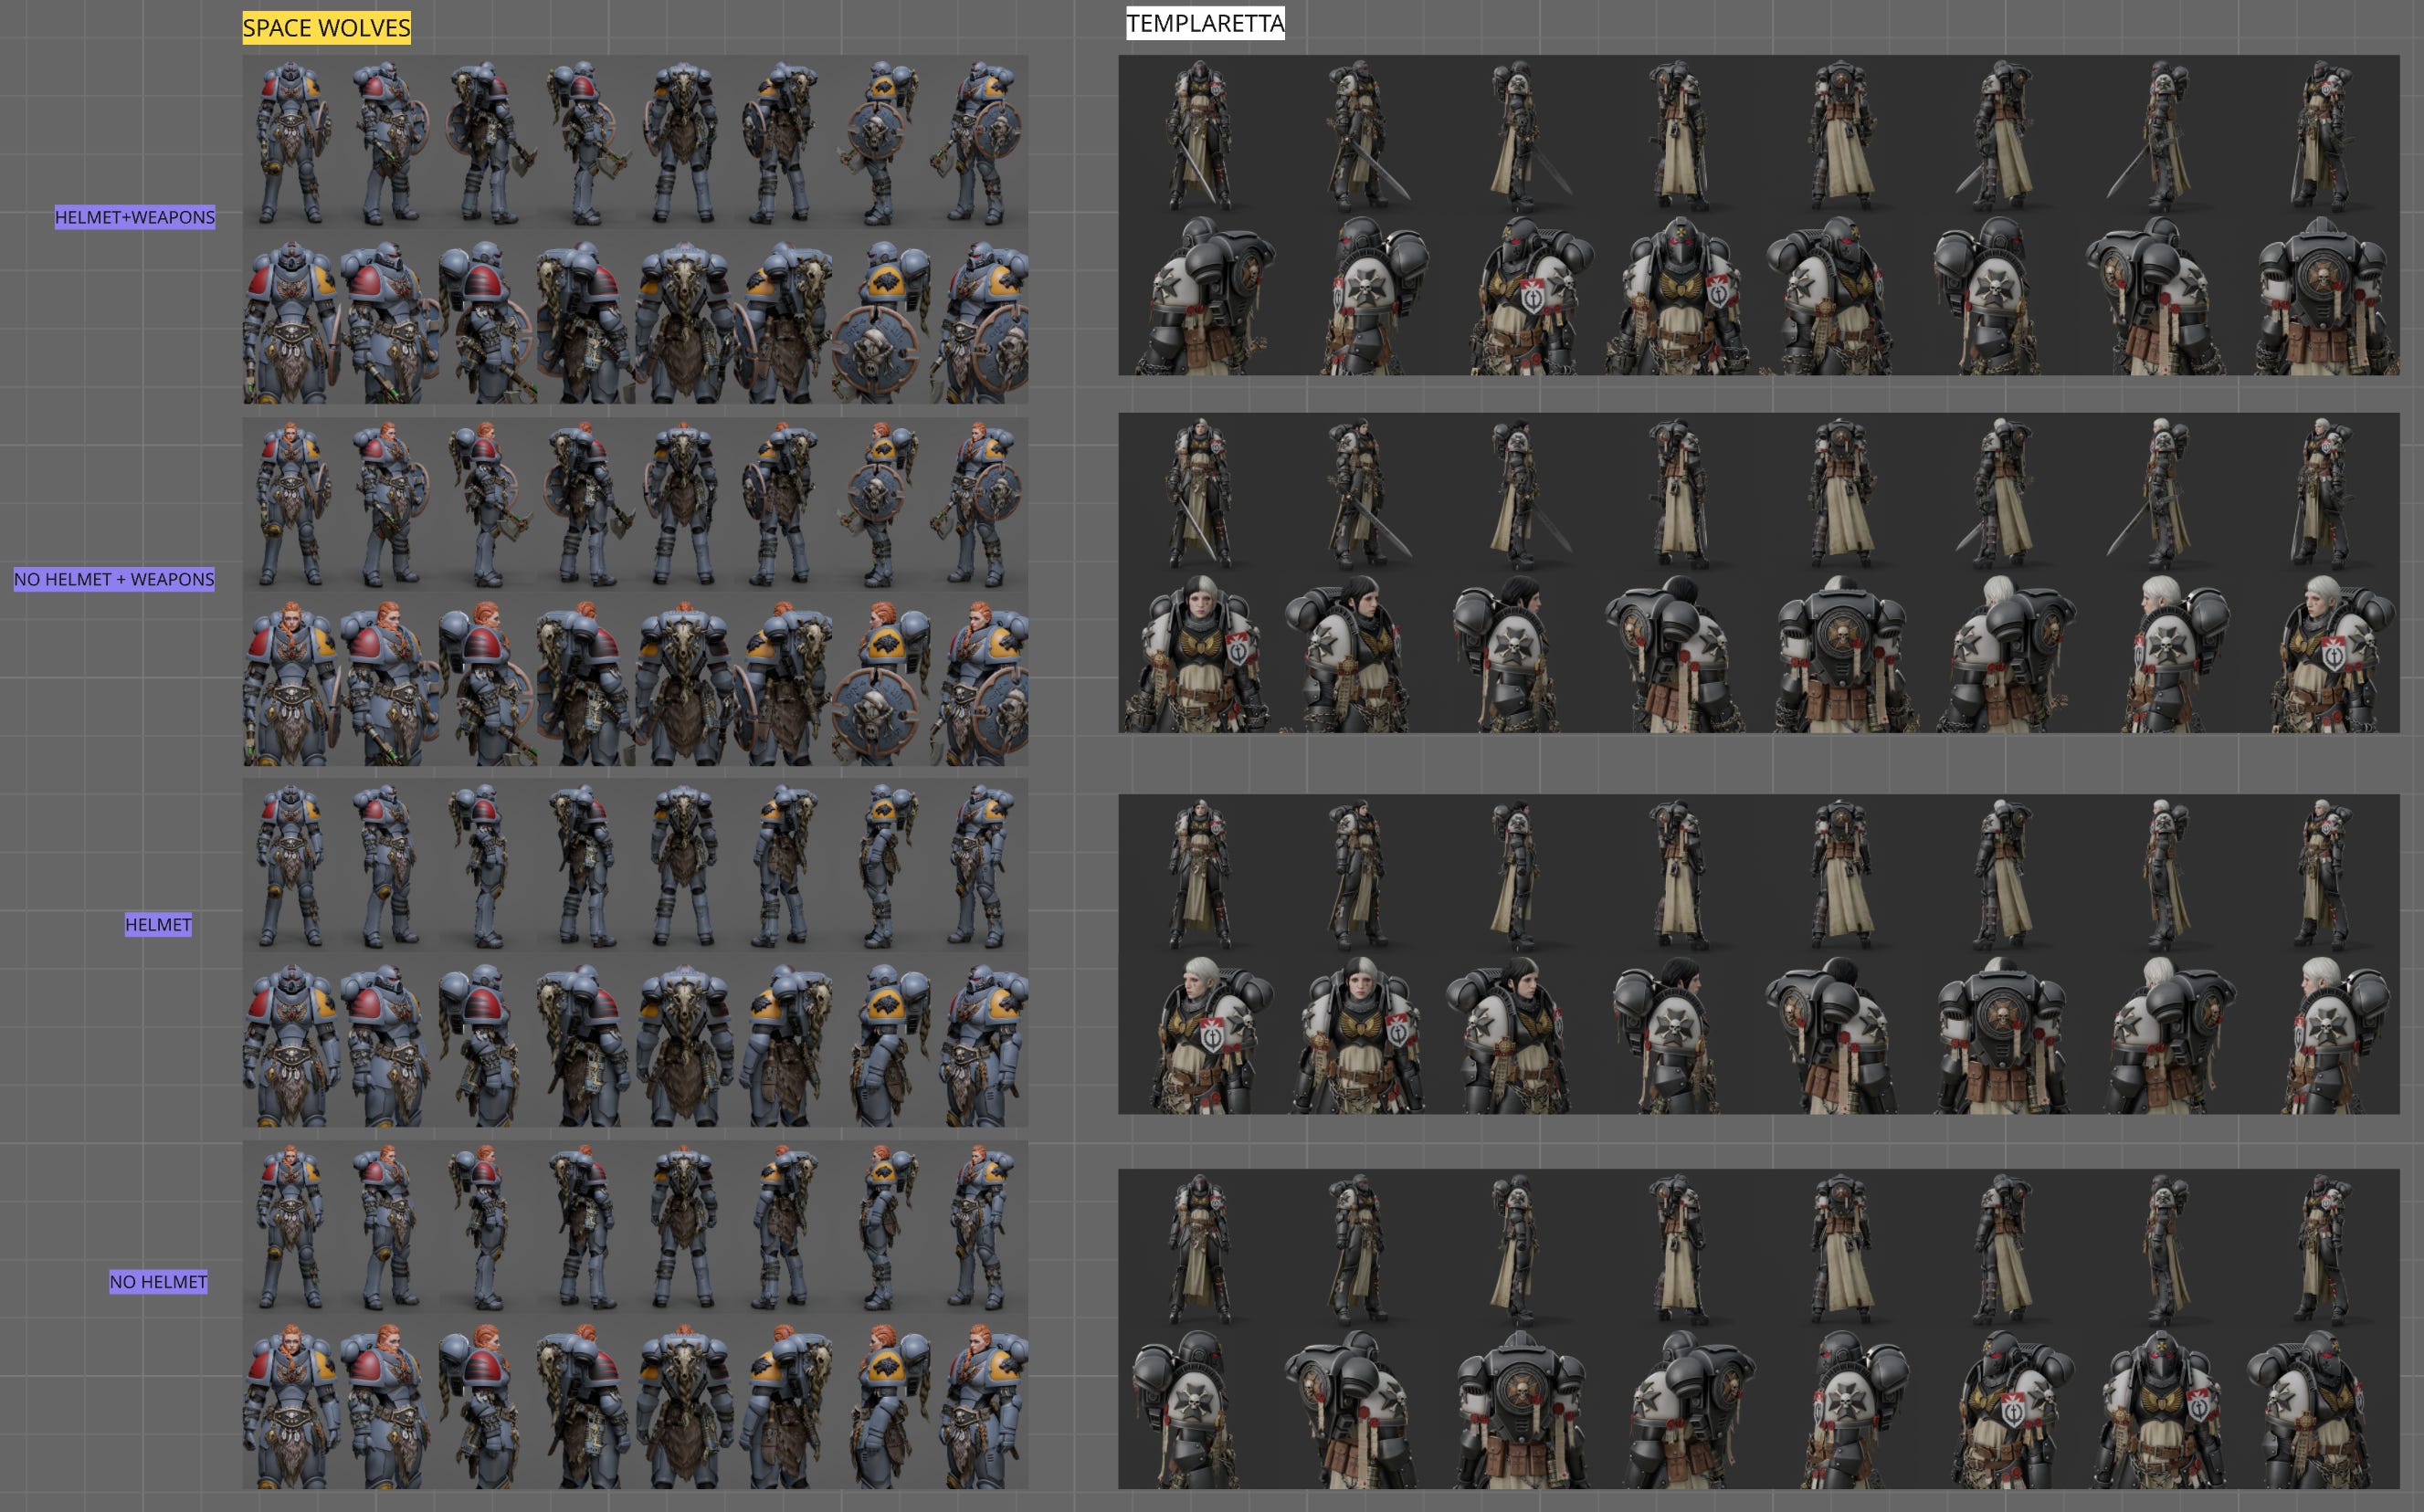
Second, I needed more than one character. A single design proves very little. A small lineup gets closer to real production conditions and allows different ideas to be tested across multiple cases.
Third, I wanted 3D to serve as a hard guide for the neural model. The point was not to “let AI cook.” The point was to force as much structural consistency as possible through 3D.
Fourth, I wanted to reduce manual sculpting and modeling wherever it made no sense to spend human effort — especially on familiar asset categories that artists often source elsewhere anyway: weapons, hairstyles, faces, accessories.
Fifth, I wanted to build a kind of character art bible: a visual system containing enough information to support future design decisions and potential downstream production.
And finally, I wanted usable prototypes. Not vague concepts, but character assets that could, if needed, be handed off to a proper 3D team for production versions intended for cinematics or games.
Why Warhammer
Why Warhammer? Because for this kind of research, it is almost a perfect test case.
The universe is deeply documented. Neural models understand it extremely well. Its visual language is highly recognizable, but at the same time broad and diverse enough to support very different design explorations within the same overall framework.
In other words, it is constrained enough to be readable, and flexible enough to be useful.
Why Female Space Marines
Why female Space Marines? Because fuck you, that’s why.
More seriously: making something new inside a familiar and highly recognizable style is more interesting than repeating the same thing for the hundredth time. It also creates a strong costume design problem, which was a big part of the appeal for me.
After my earlier “fat marine” project, I wanted to see what Primaris armor would look like on a female body while preserving an appealing silhouette, maintaining mobility, and avoiding the usual clumsy armored-brick outcome. That is a real design challenge. I had wanted to tackle it for a long time, but kept postponing it because of how much pure modeling work it seemed to require.
By 2025, though, 3D generators had matured enough that this became worth testing seriously.
As I said earlier, mesh quality and topology were completely irrelevant for this specific project because everything was going to be rendered in static form. That immediately made generation useful for all the parts I did not want to spend time sculpting by hand.
And this is a very familiar pattern in character work.
There are parts you can happily spend endless time on: head, face, hair, breasts. And there are parts you always postpone because they are tedious and annoying: gloves, boots, cloth, small accessory junk.
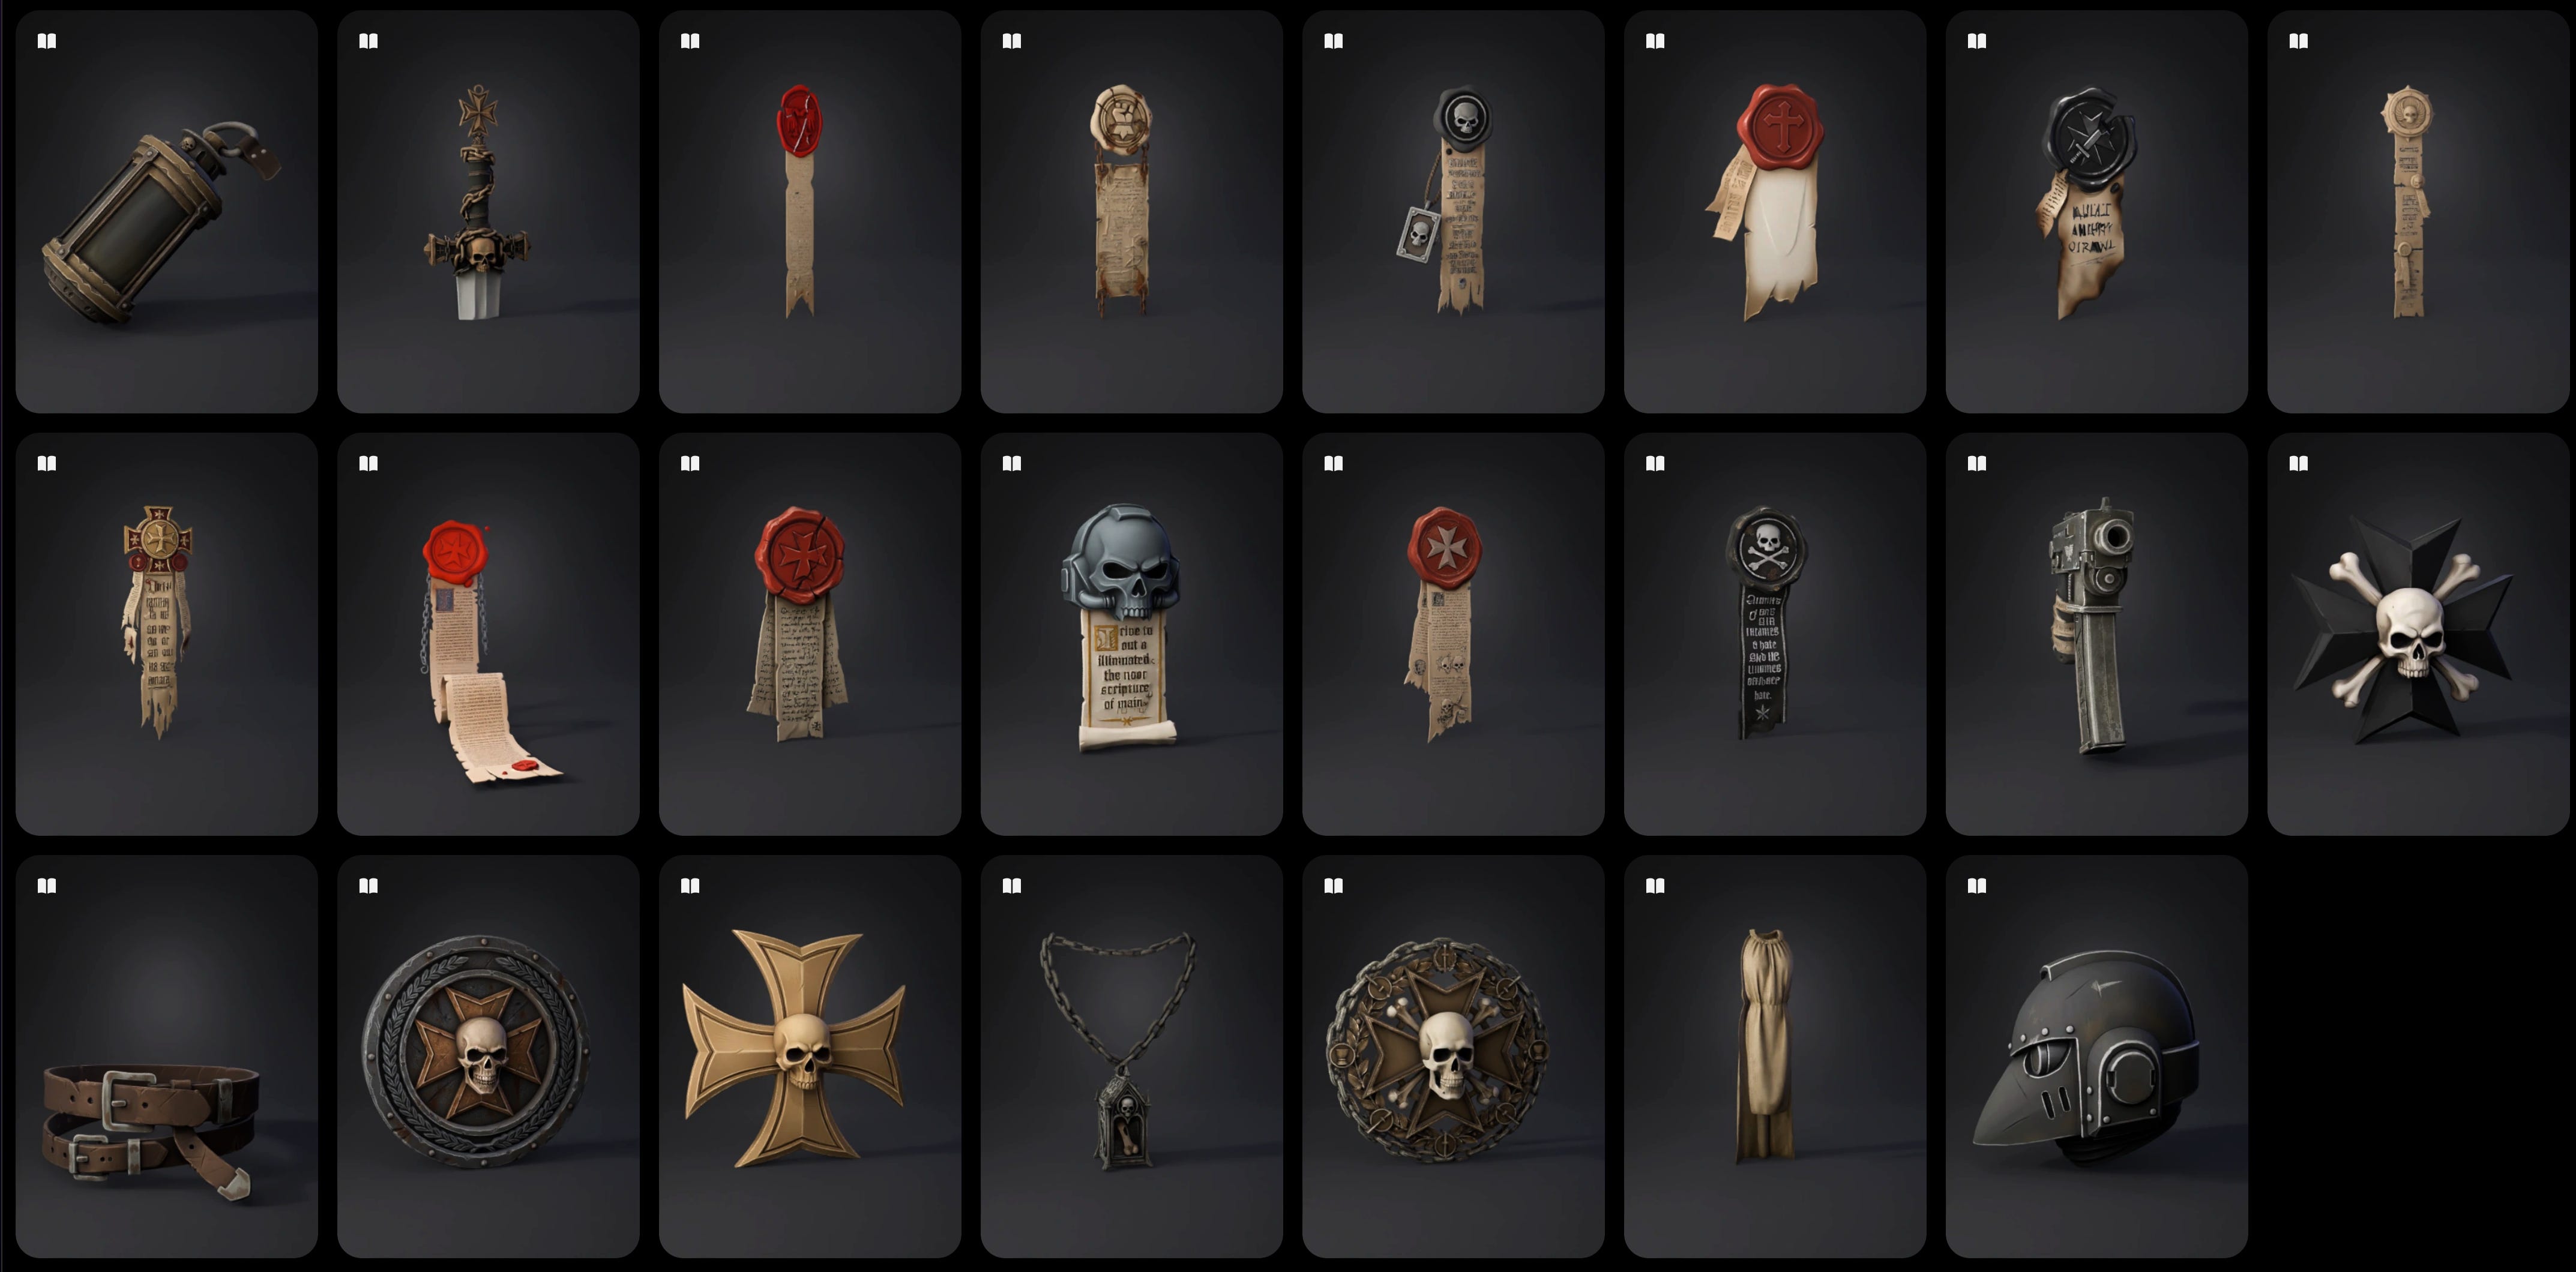
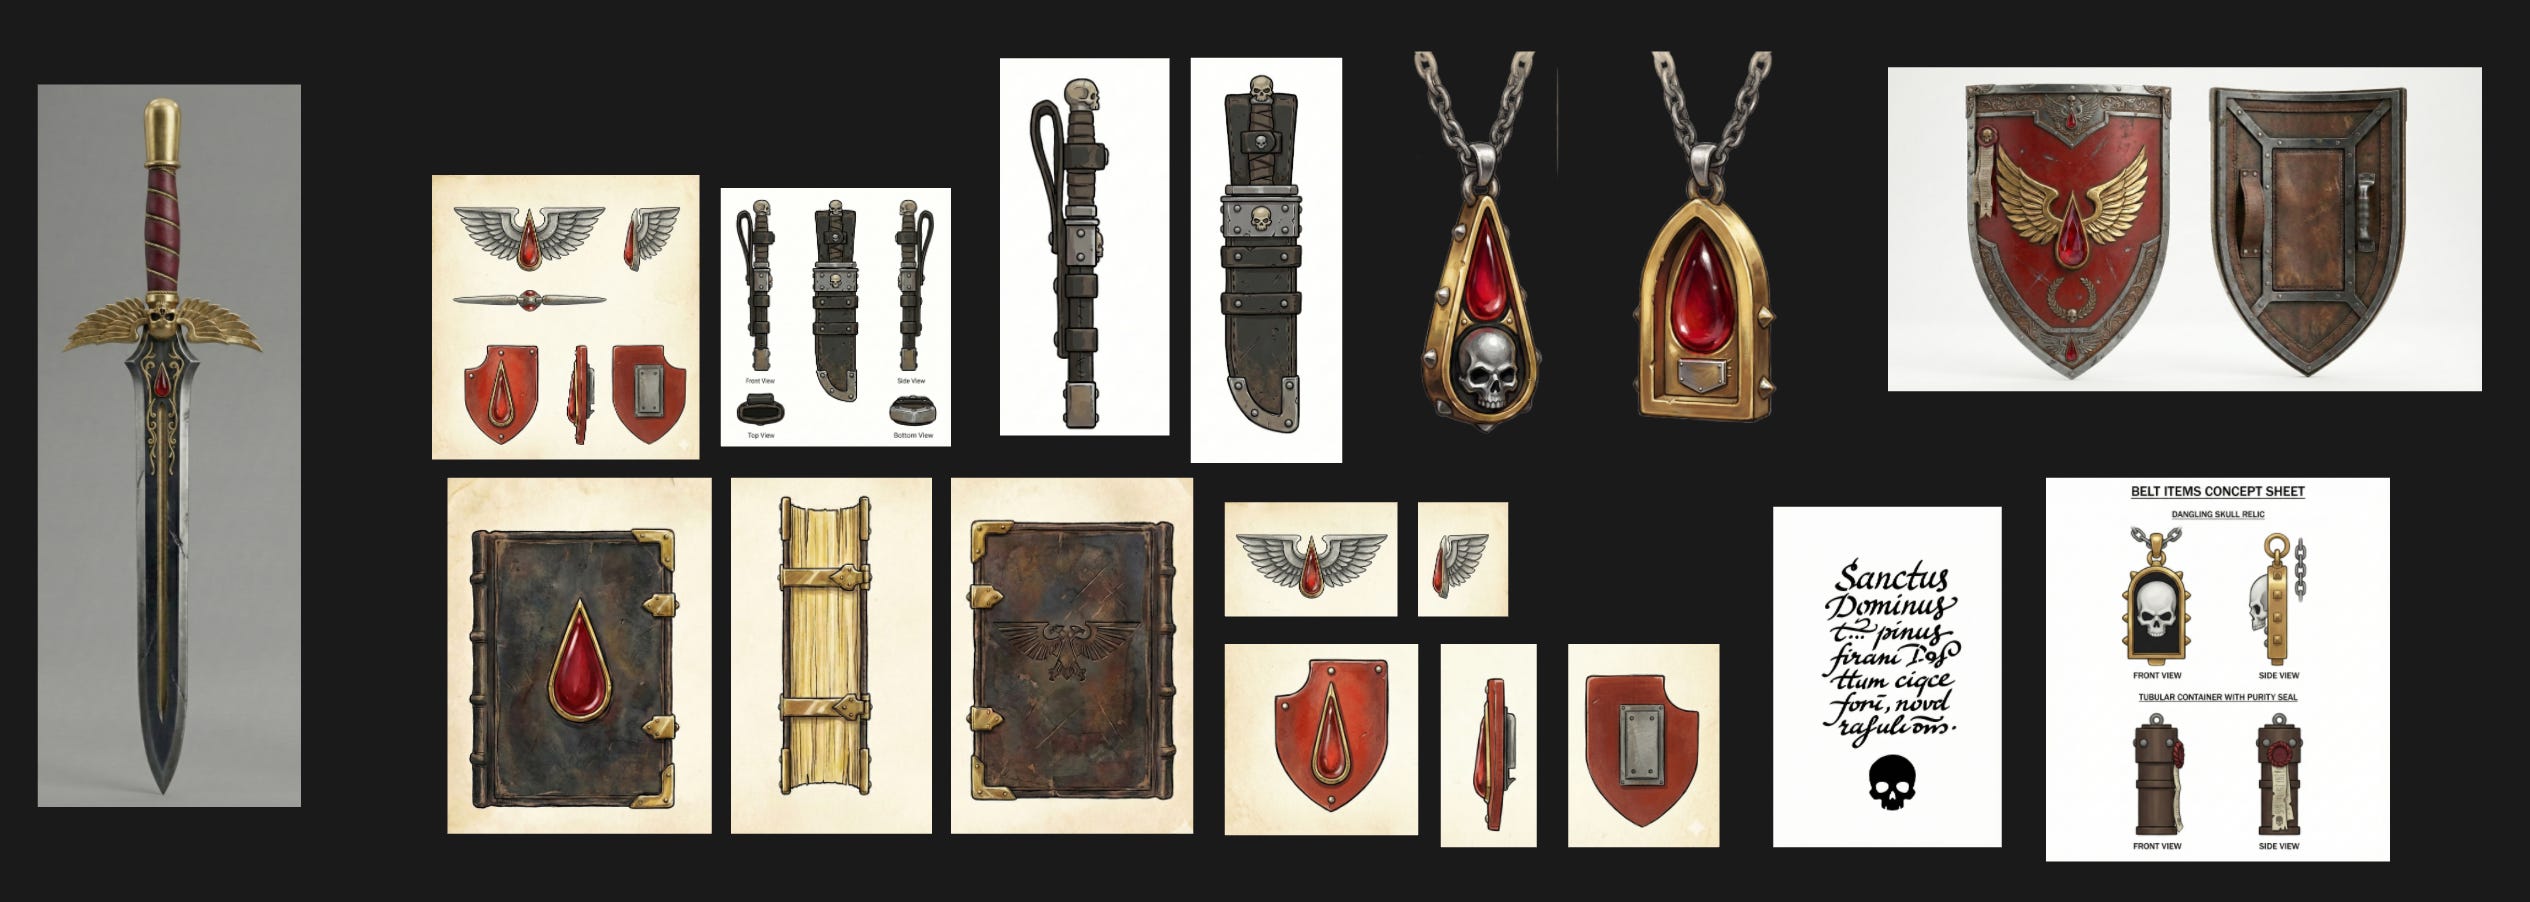
Warhammer is ideal terrain for this workflow because the characters naturally split into two layers: a relatively simple low-detail base — armor and helmet — and a very dense high-detail layer of regalia, relics, ornaments, chains, magazines, weapons, seals, and accessories.
All of that is fun to model if you have time and someone is paying for it. But that was not the point here. The point was speed. Reaching the finish line fast mattered more than honoring a traditional production process.
Fortunately, current generators are already detailed enough to make that trade worthwhile.
Build the Base by Hand, Generate the Rest
Most current 3D generators still operate within a practical resolution ceiling. In real terms, that means you only get reliable quality if you generate characters in parts. Trying to generate a fully detailed character in one pass still tends to produce an unusable lump.
So the solution was obvious: sculpt the base armor by hand, and generate the smaller detail layers and heads with neural tools.
I am not going to go deep into sculpting here because it is not the interesting part of this article. In short, the workflow was straightforward: Dynamesh blockout, some hard-surface support pieces for armor elements that needed to preserve clean form, nothing unusual. You could do that in Blender, Nomad, ZBrush, whatever. ZBrush is not the point.
The point is this: AI likes strong shapes. Clear geometry, sharp edges, flat surfaces, readable construction. If your base model is vague or mushy, the output will drift.
But the more interesting issue is not modeling. It is control.
The Myth of Control
A lot of discussion around AI art still revolves around “control,” usually framed as if total control were both possible and desirable.
I do not think either is true.
Back in 2023, when Stable Diffusion first appeared, I started experimenting with ControlNet. Even then I could already see the promise of combining 3D and AI. My obsession was precise rendering of 3D models with photoreal materials and lighting — the kind of result that usually takes a lot of careful manual work in traditional 3D.
The early experiments were interesting, but they also clarified the limits of each approach.
Traditional img2img with low denoise values could produce very attractive results, but it often destroyed the original design intent and hallucinated details that did not exist before. That made it useless for my purposes, because the same character rendered from two different angles would not remain consistent.
txt2img with ControlNet gave much stronger shape control. The form could be driven by normal maps, line art, depth maps, and other structural inputs. But texture treatment remained only loosely controllable, because ultimately it depended on prompting — and prompting is still one of the least reliable ways to steer a model.
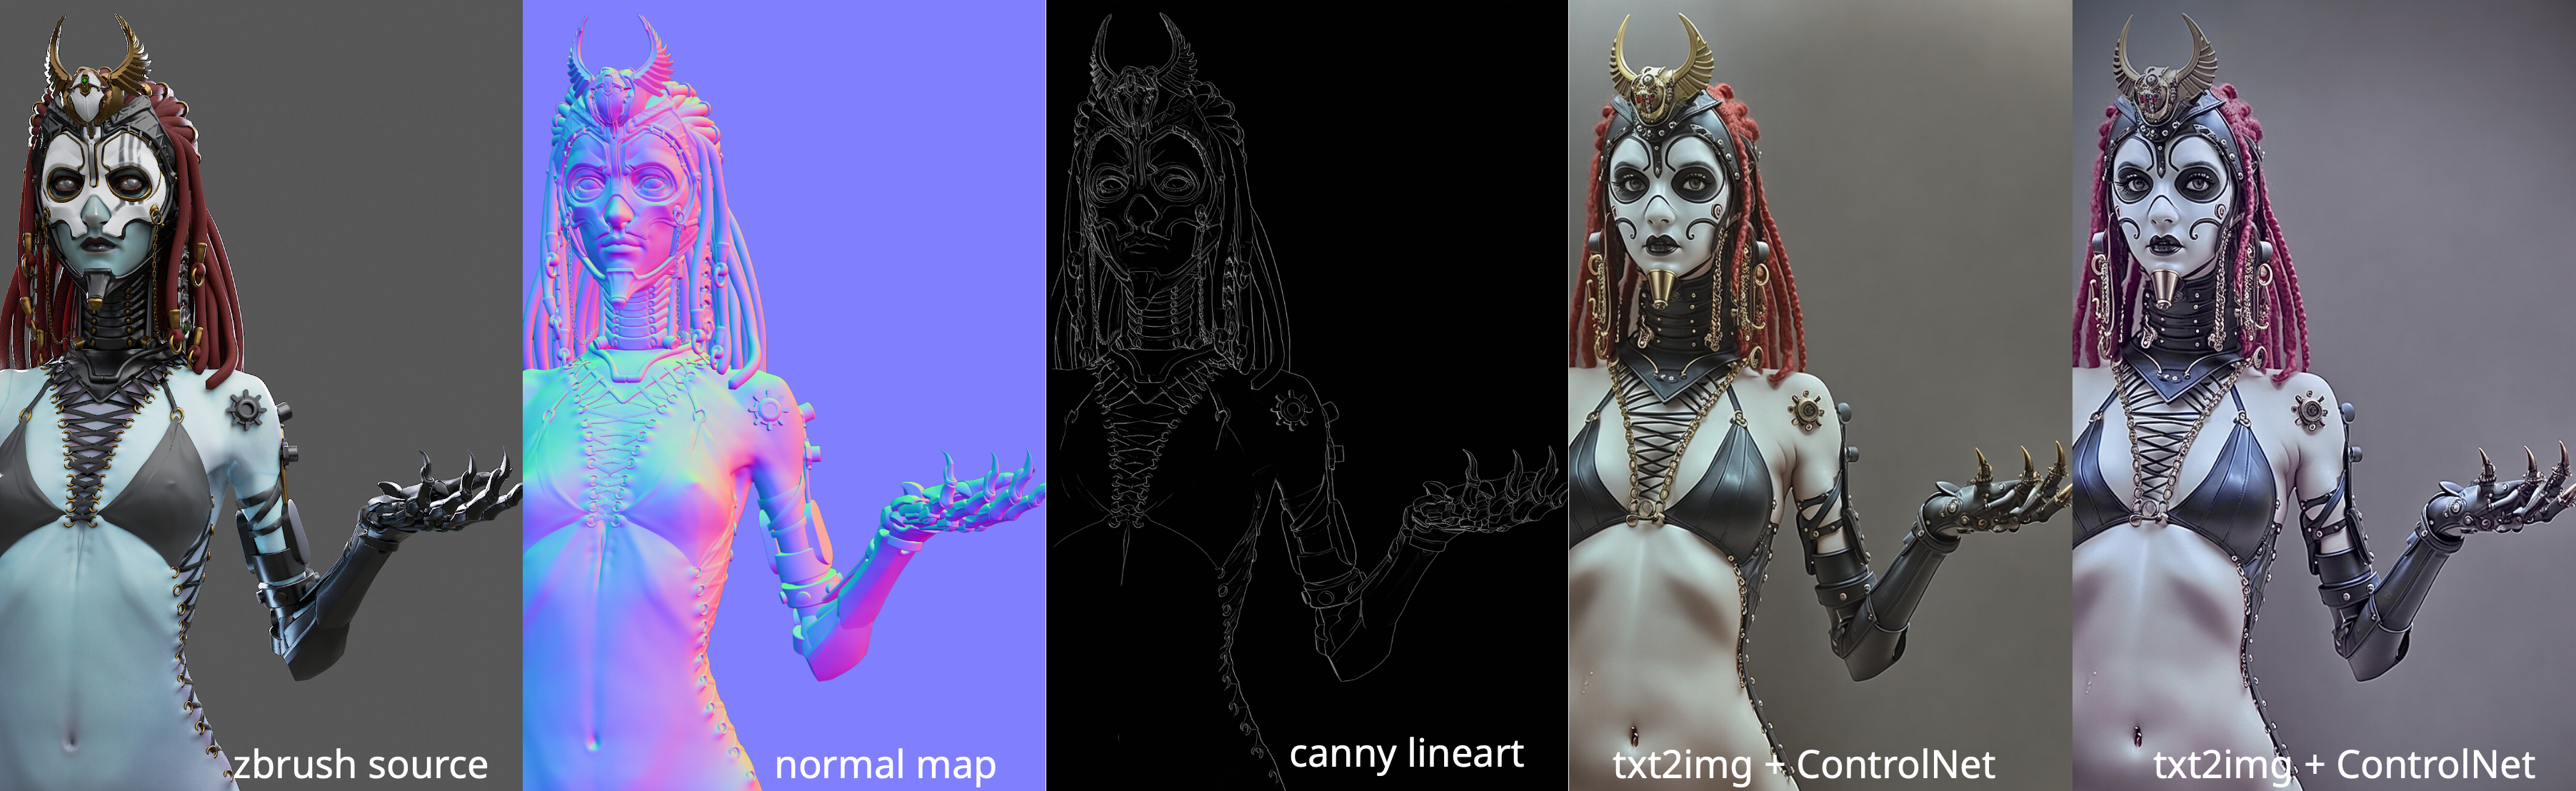
img2img plus ControlNet was the hybrid of the two: a lightly denoised source image, plus structural guidance. This produced more faithful results and preserved color and lighting better.
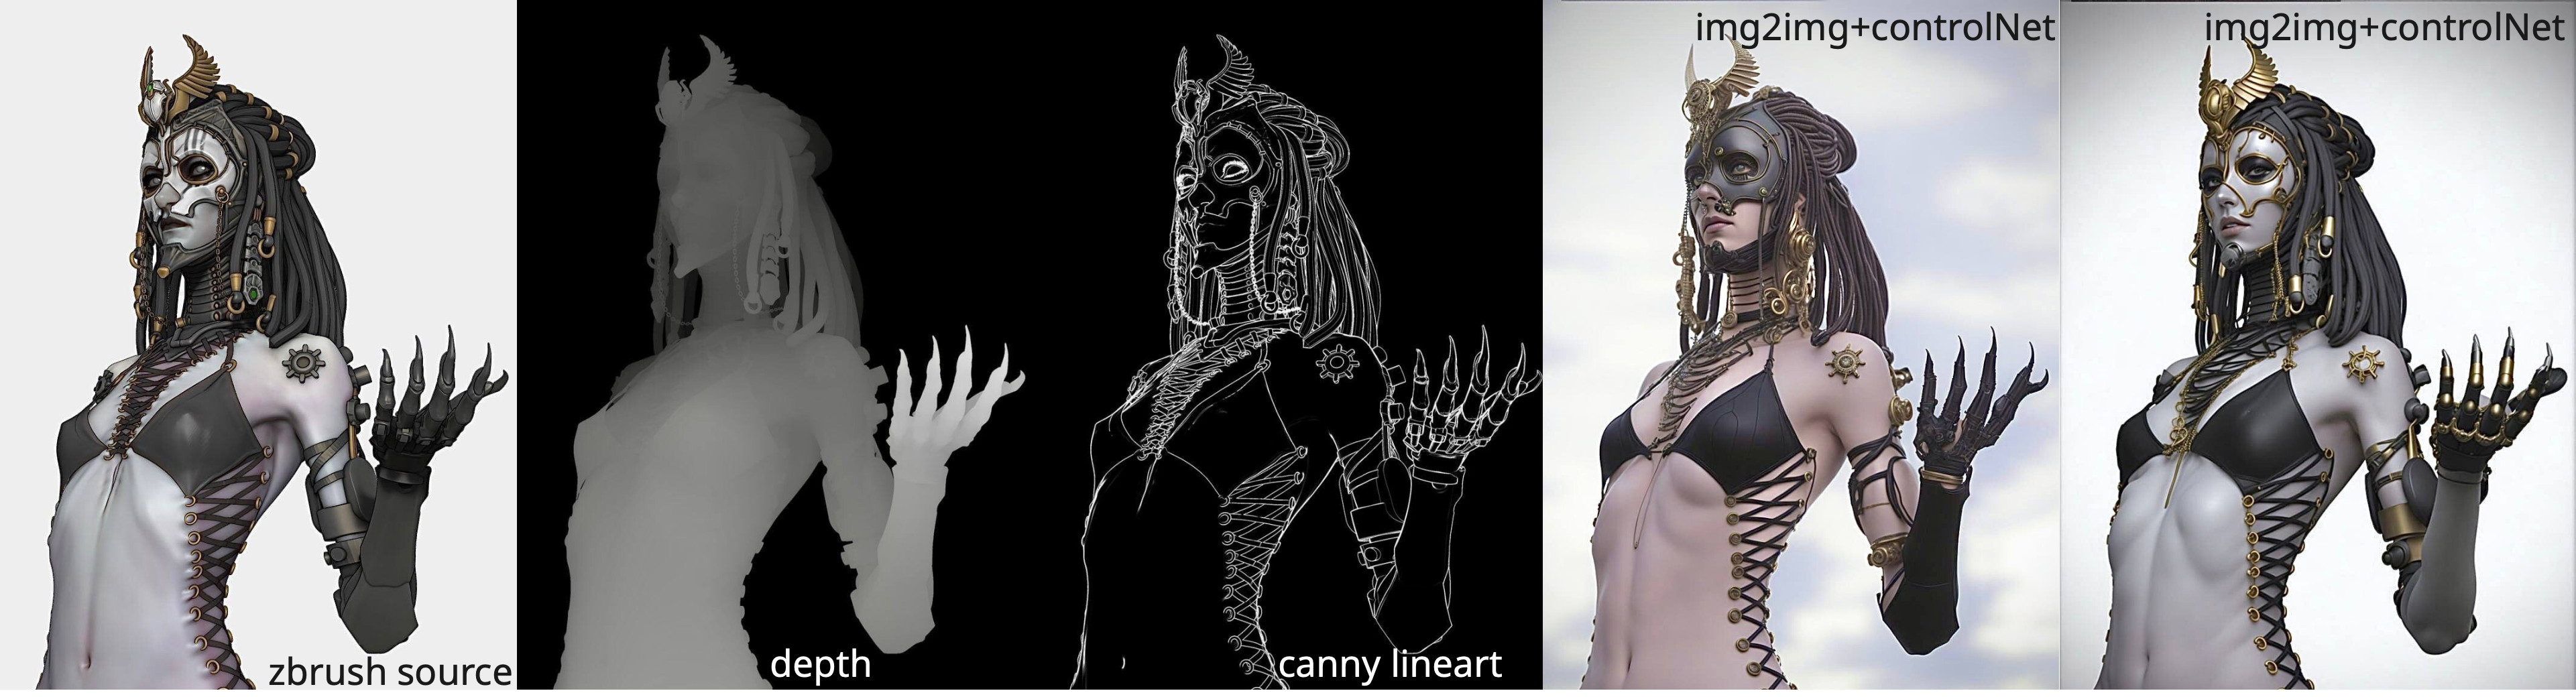
In practice, the pipeline worked. But I still did not like it.
There was too much setup, too much prep, too much dependence on auxiliary channels, and above all too much variation between outputs. So I put the whole thing aside for a few months and shifted my attention toward rigging and animation.
Then Flux Kontext arrived, and suddenly a lot of the friction disappeared.
All the tedious ControlNet choreography became less important because the model could handle much of the visual inference on its own. Instead of constructing a fragile multi-channel pipeline, the user could simply provide an image and a prompt describing what needed to change. The model would infer the sequence of operations by itself, whether that meant compositing, material reinterpretation, or broader image restructuring.
I tested this on my older drawings, pushing them toward photoreal rendering through a local Comfy setup, and the results were already promising. After a while I set it aside again and returned to my 3D work, but the direction was clear.
Then, in early 2026, I finally tried Nano Banana Pro inside Gemini for the same category of work.
At this point, for me, it became the best model for this kind of task.
It did not take long to understand how to use it well. In fact, Gemini itself is pretty good at explaining how to use Banana if you ask the right questions. Which is why I am not going to include prompt examples here. Do not pay grifters for “AI courses.” Just pay the model and ask it directly.
The Hidden Power of Contextual Editors
The real power of contextual editors like Nano Banana is not just image quality, though the image quality is good.
The real power is vision.
By that I mean the model’s ability to read visual structure, infer missing intent, and reconstruct design logic even from weak or incomplete references. During this project I generated a large number of concepts from very poor source material, and Banana handled that remarkably well.
One of my earliest tests was asking it to extract ornamental design language from a single photo of a Space Marine figurine. It did a surprisingly good job.
That is not magic. Warhammer is a heavily learned visual domain. Gemini and Banana can parse its design grammar almost effortlessly. But what matters is the production implication: this becomes a major time saver in concept development.
AI as Concept Acceleration
This is where the first serious production advantage shows up: concept art.
I have worked with many concept artists over the course of my career. I have also done concept work myself. I know this part of the pipeline from the inside, and one truth remains constant: nobody wants to pay for more concept work than is strictly necessary to keep production moving.
What qualifies as “enough” is usually defined by a lead or art director, and in practice it is often not enough for comfortable downstream 3D work. The 3D artist still ends up filling in gaps, gathering references, inventing missing details, and solving unresolved design problems.
My project did not begin with formal concept art at all. In a sense, the project itself functioned as a higher-level concept stage. But for generating ornaments and accessories, I still needed reference material.
Normally that work lands on the 3D artist: collecting references on Pinterest, compositing them, cleaning them up in Photoshop, preparing usable callouts. It is time-consuming and rarely acknowledged as real labor.
Nano Banana can do that instantly from a very simple prompt.
And once you understand that, the number of useful manipulations becomes nearly endless.
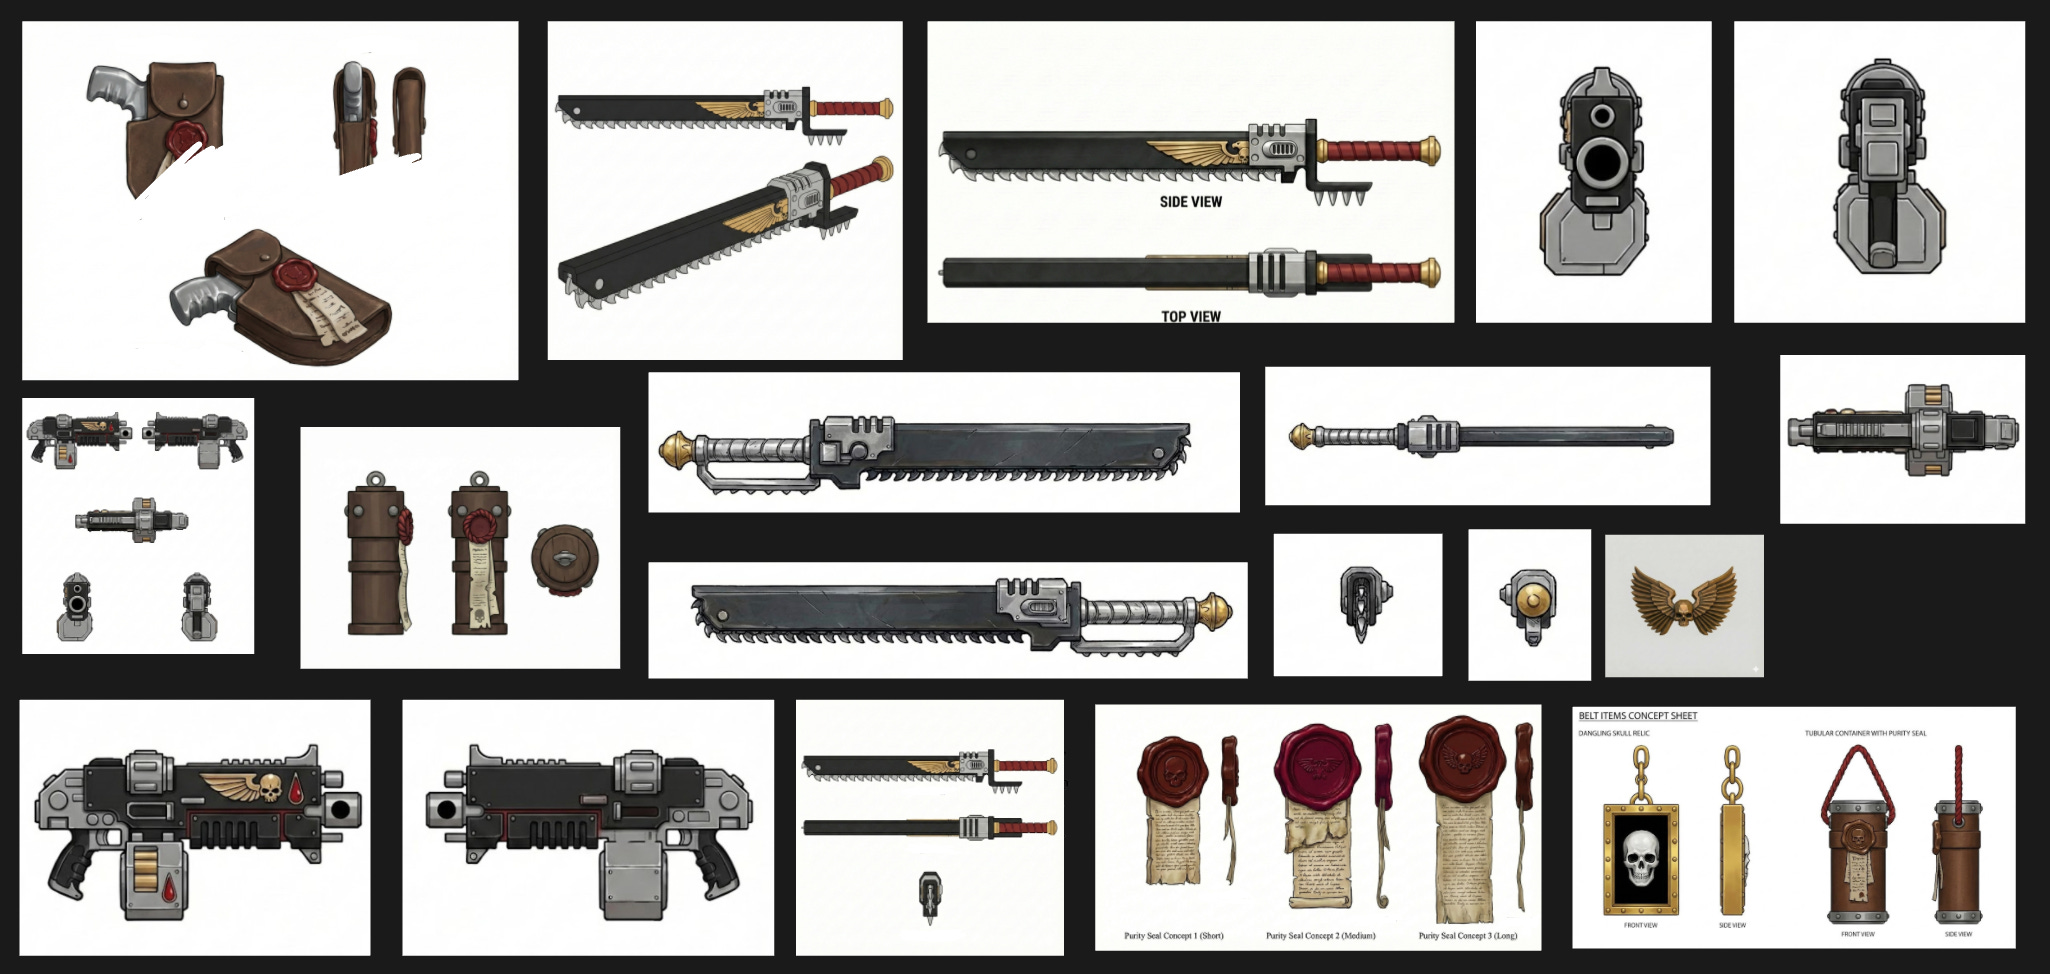
Generating 3D Parts: The Actual Rule Set
Most 3D generators allow you to provide orthographic views — front, side, back. That helps the model hold proportions and construction together and reduces the chances of weird interpretation.
The basic rule is simple: input quality directly affects output quality. If you want fewer broken generations, you need cleaner references.
That said, not every object requires orthographic treatment. Flat elements or straps, for example, often generate just fine from a single image.
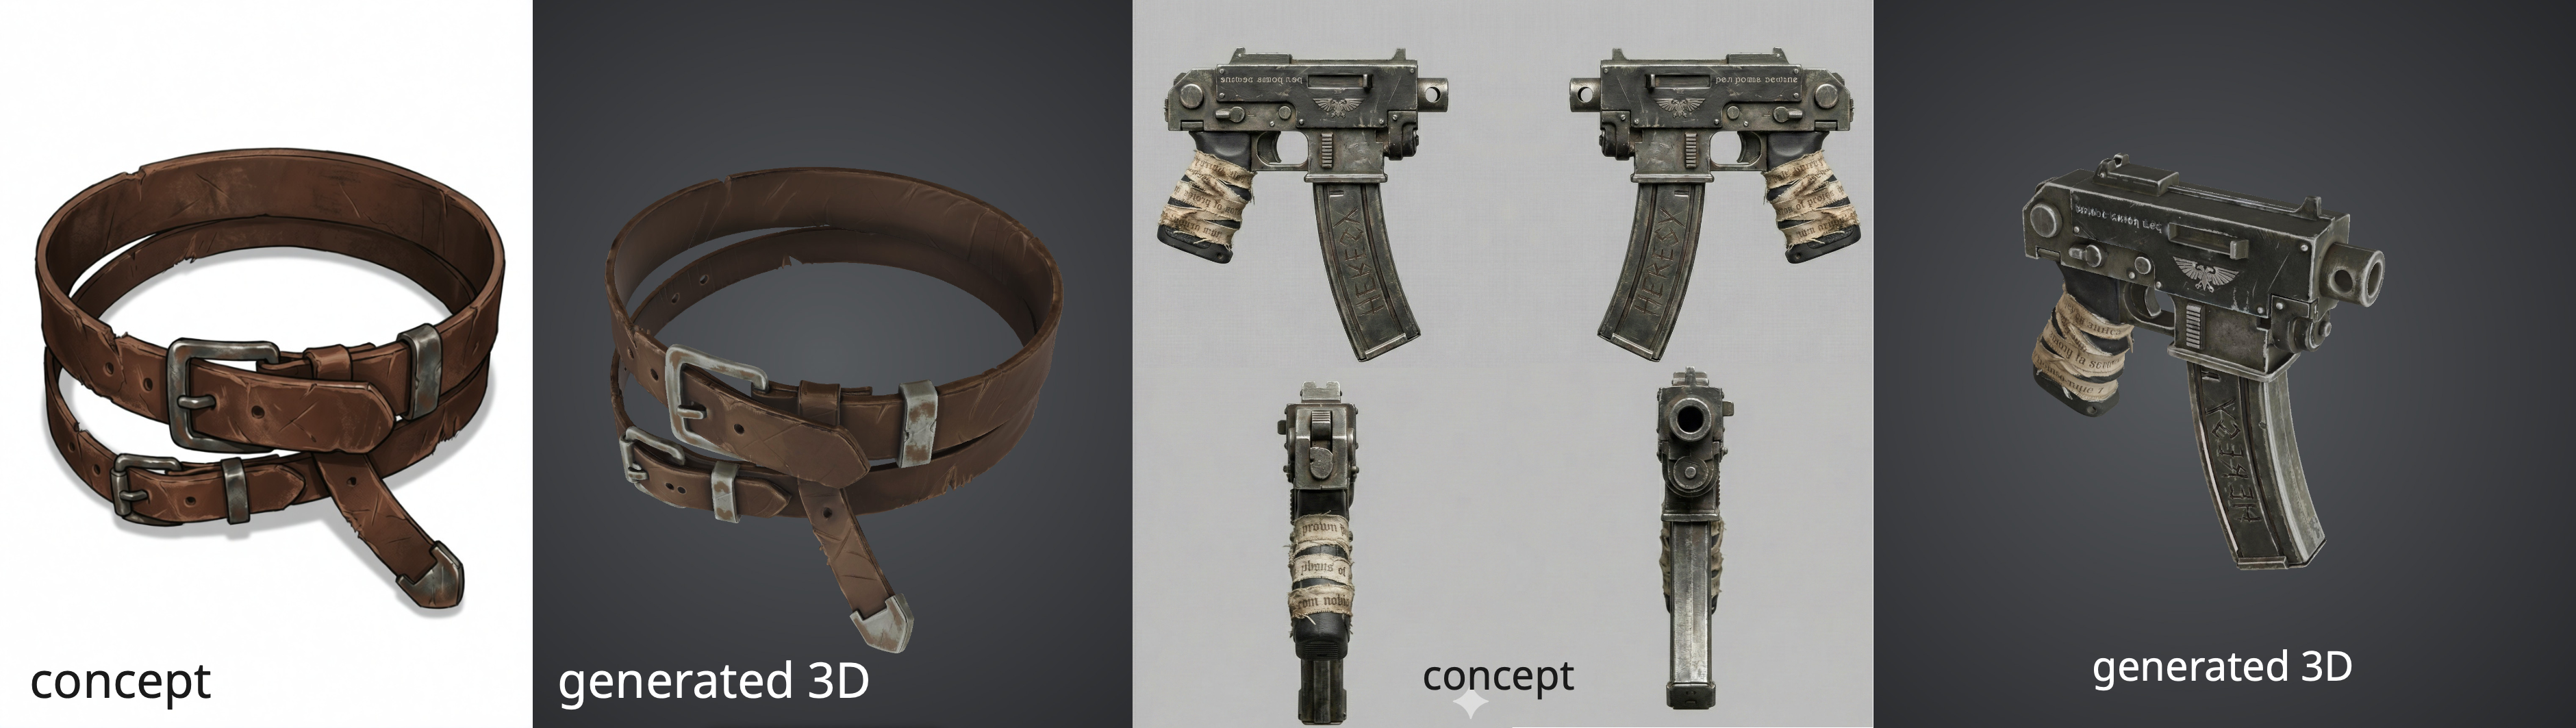
The more important rule is scale.
The smaller the object you generate, the better its quality relative to the whole character. If you generate a large object like a shield in one pass, then generate a small medallion using the same detail settings, the medallion will almost always come out sharper and more usable.
That means some objects have to be broken into parts. A sword is the obvious example. In most cases it is better to generate the hilt separately from the blade. The quality gap is noticeable.
Which 3D Generator Is Best?
Hard to say.
At the time of writing, all major services have strengths and weaknesses. Some things work better in Tripo, some in Meshy, Hunyuan has its own interesting advantages too.
My practical advice is simple: pick one main tool, but keep one or two backups ready in case your primary generator fails on a specific task.
That happened to me more than once. Sometimes Tripo produced nonsense and Meshy handled the same task much better. In most other situations I still preferred Tripo. The differences are real, but not dramatic.
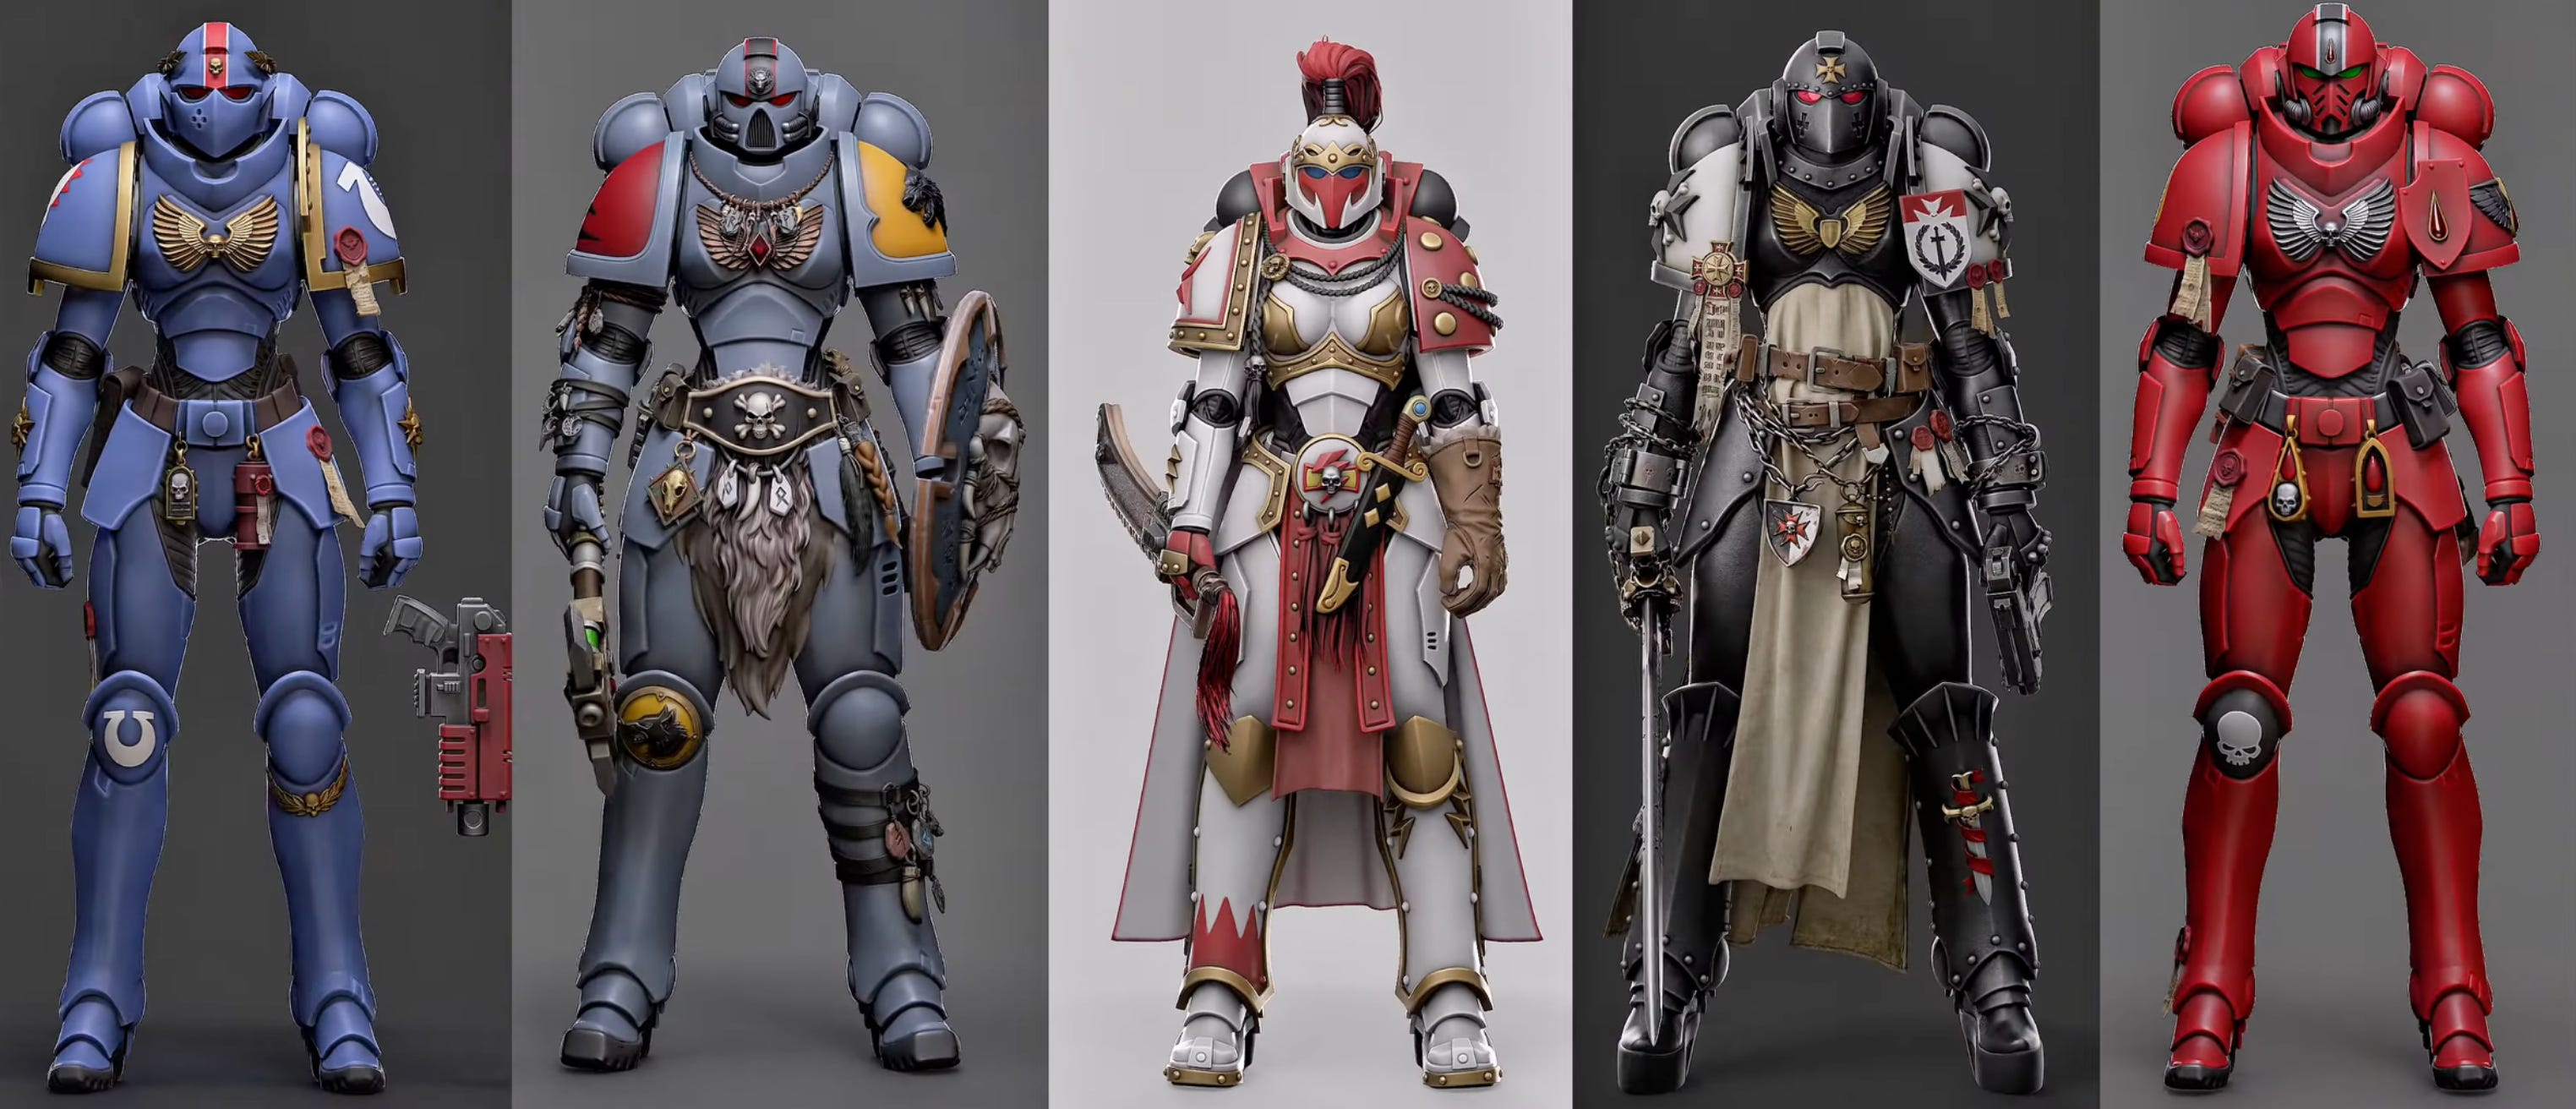
What the Character Series Actually Proved
The first design was relatively restrained in terms of generated accessories. I was mostly happy with the weapon generation, which already worked well enough at the sketch level.
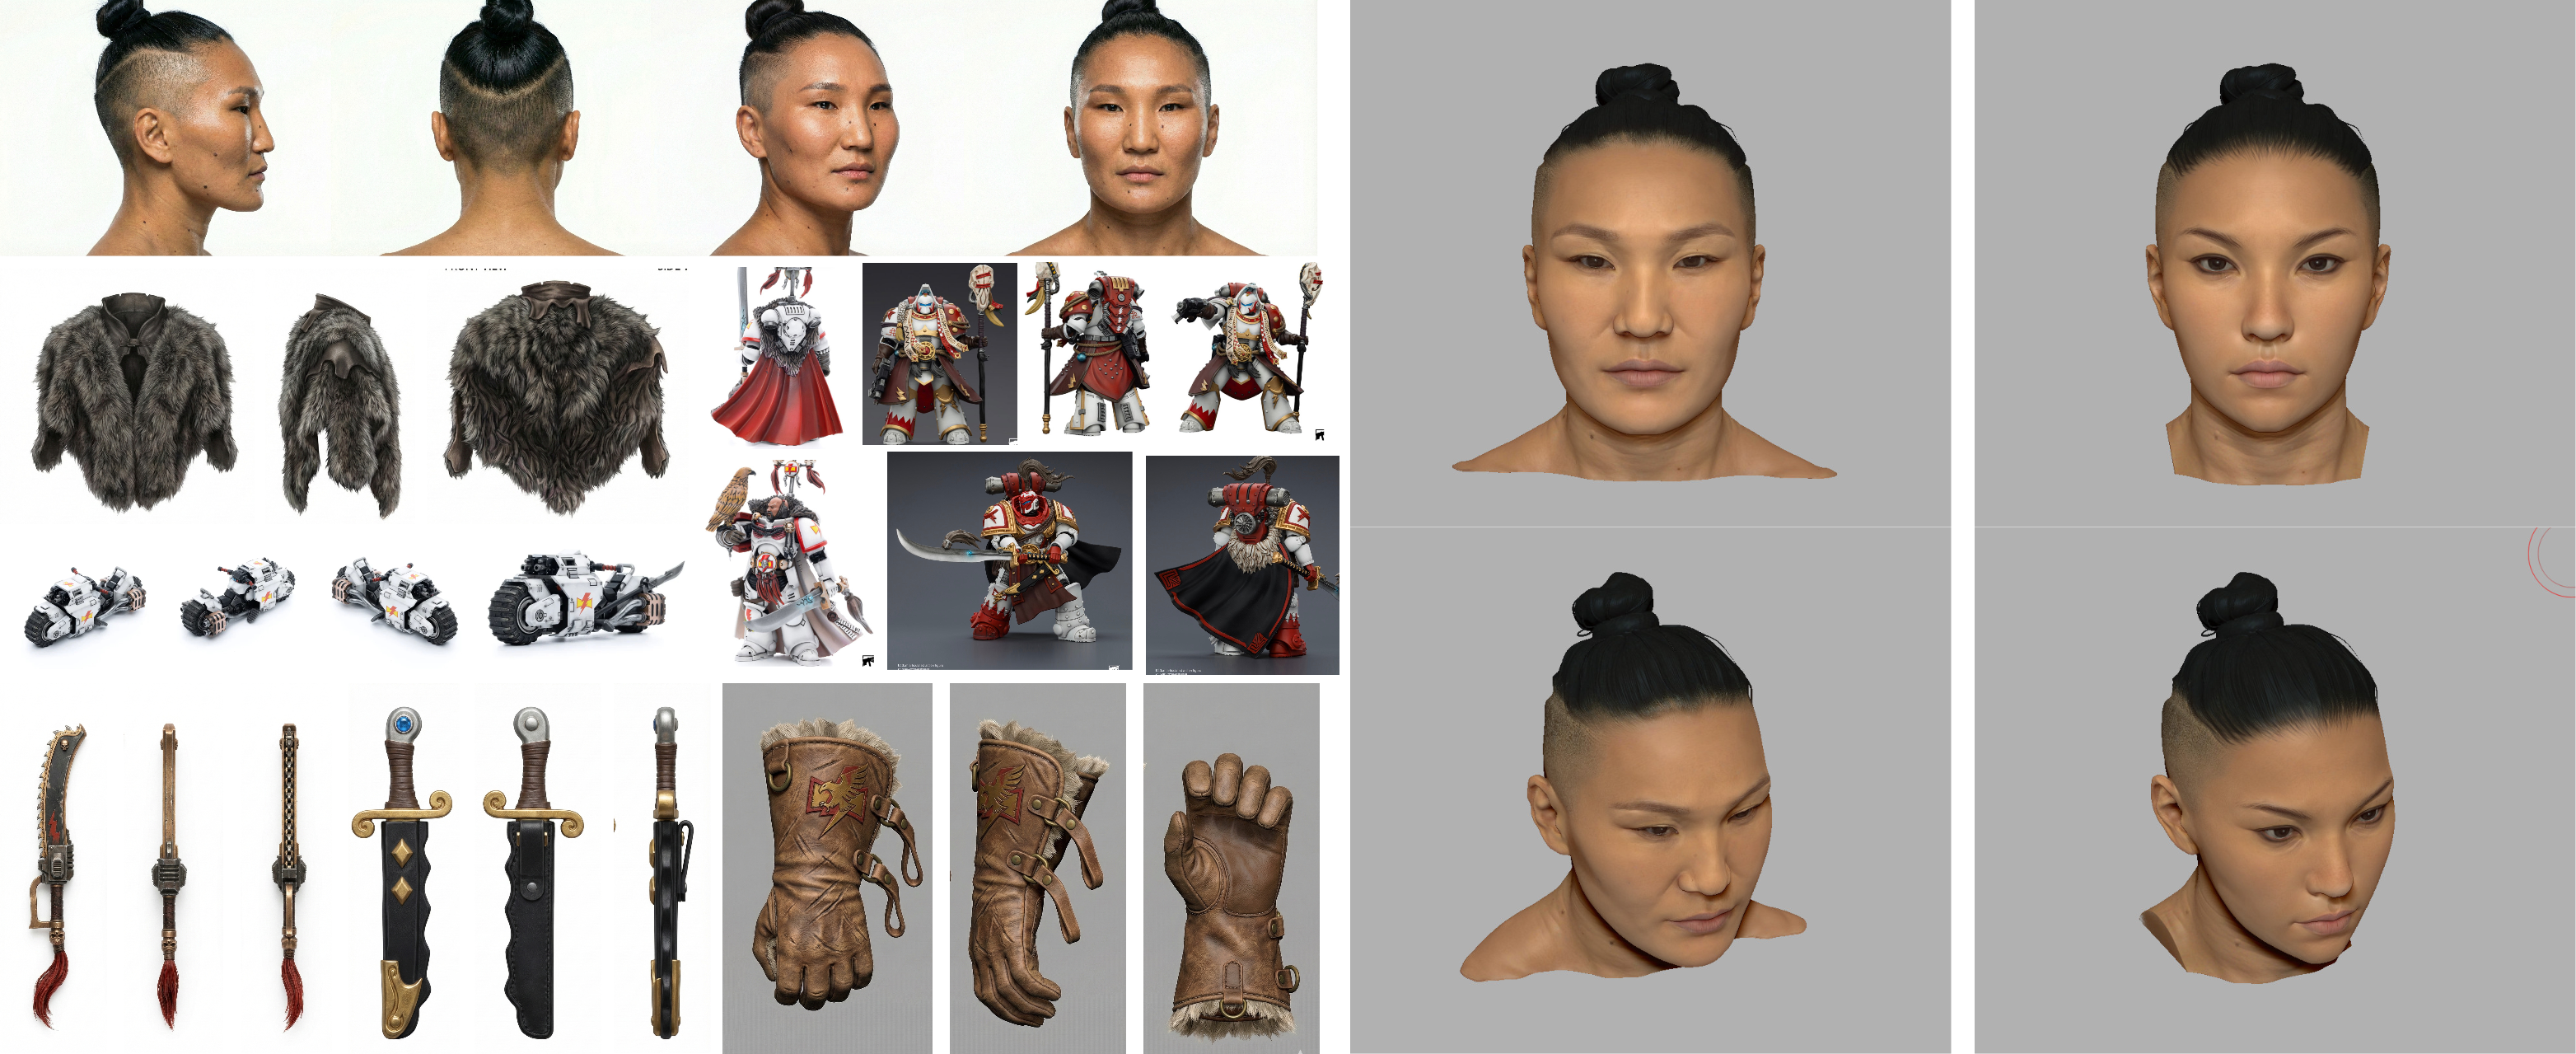
In the second design I pushed the generated detail further and began experimenting with head generation.
This had been on my mind for a long time.
I have sculpted a huge number of heads over the course of my career: realistic, stylized, from concept, from scratch. And there is always one recurring problem: your own authorial habits start to show. Facial design carries personal bias very easily, and it is hard to escape your own defaults.
3D scans are one answer, but scans are expensive, and they require a real human source.
If it were possible to generate a human portrait and derive a usable head model from that, it would be a major advantage. More importantly, it would help break the recognizable facial sameness that often comes from sculpting from scratch or from the same basemesh logic over and over.
That is exactly what I started doing from the second character onward.
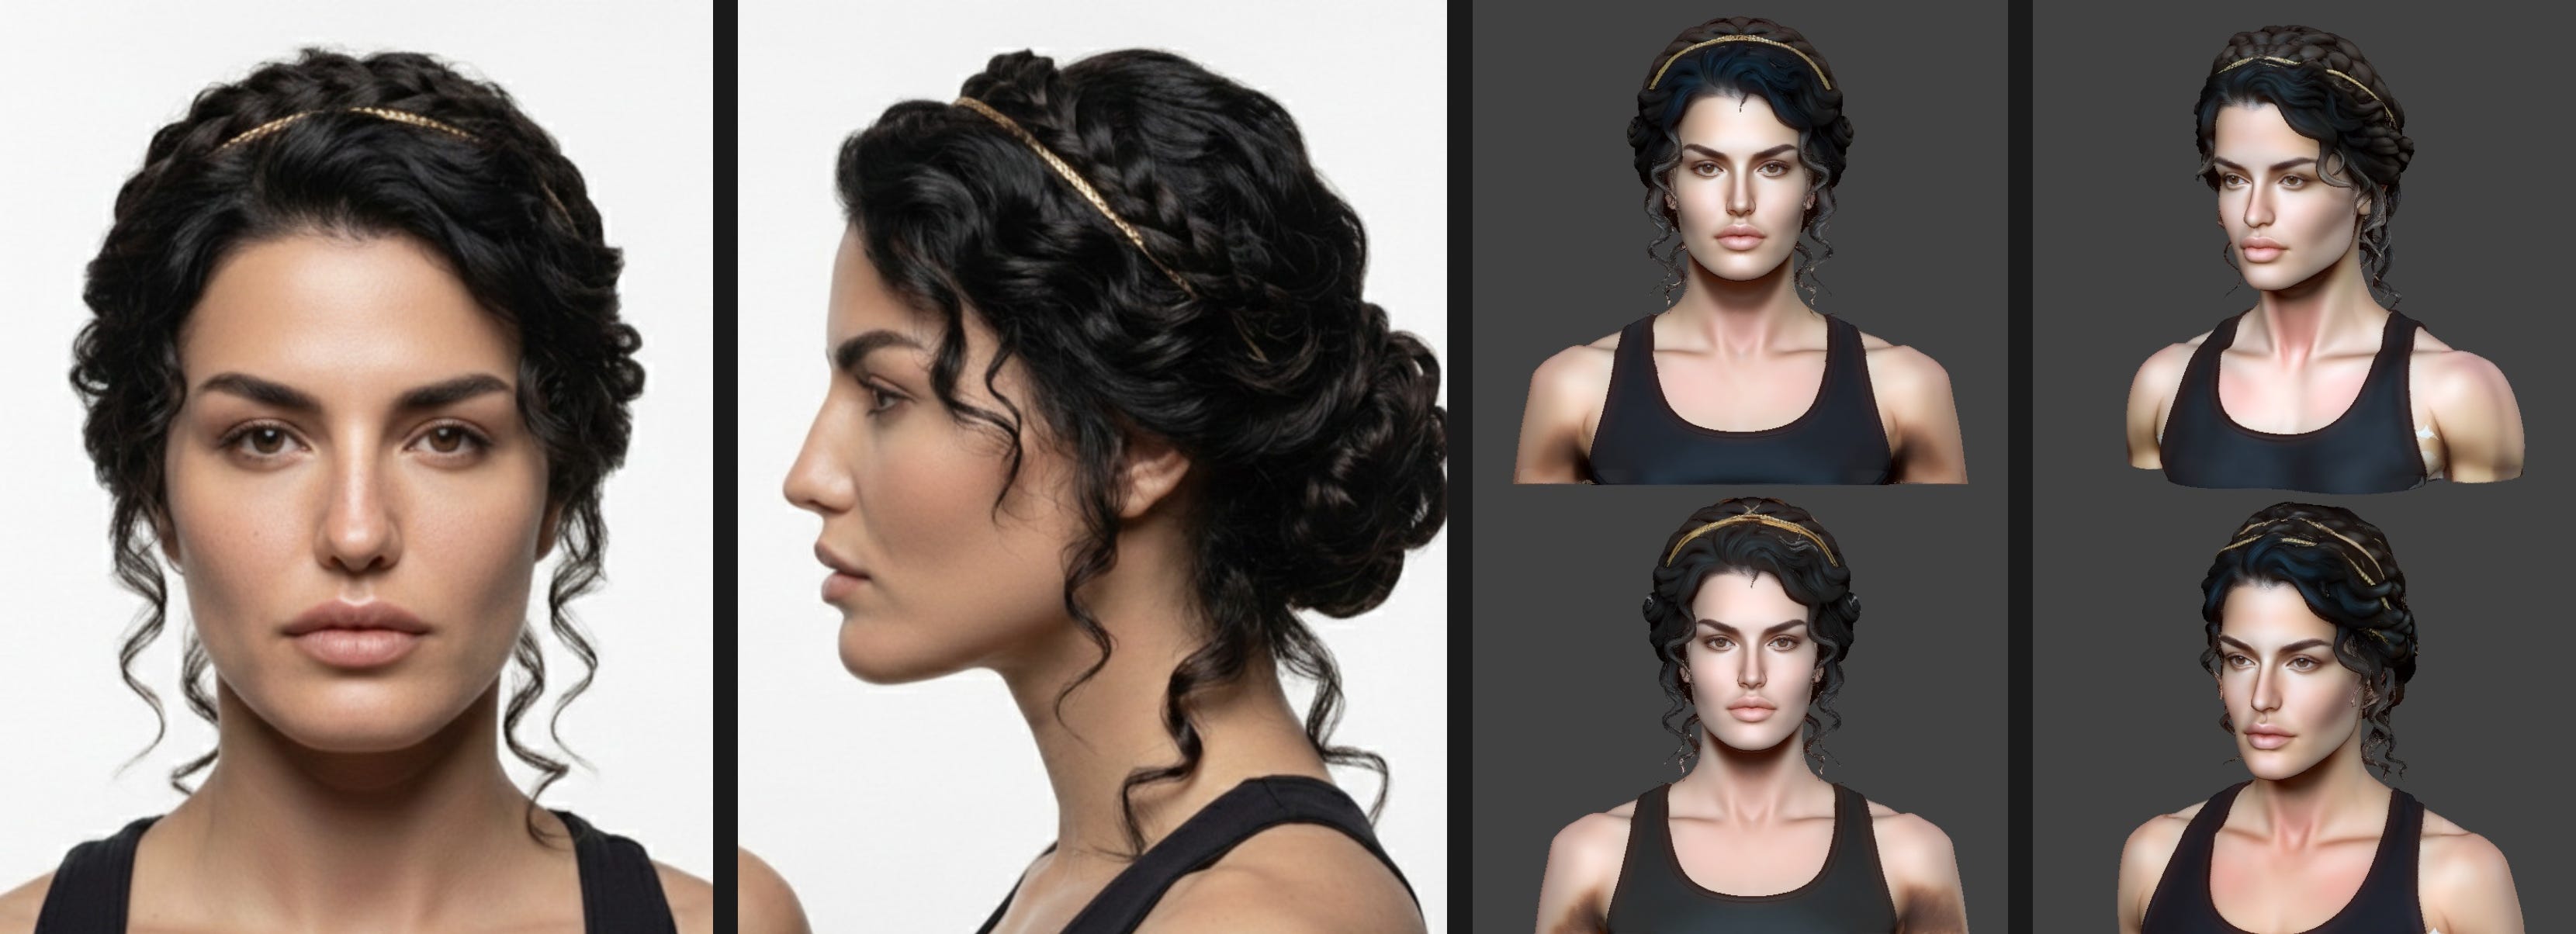
I generated a Greek-looking woman in Nano Banana, sent that image into the 3D generator with the hairstyle included, and then spent some time cleaning and refining the result. For a first test, it worked well. More importantly, it did not look like one of my usual female faces.
Later I started generating hair separately from the head and keeping the head bald first, which made anatomical cleanup easier.
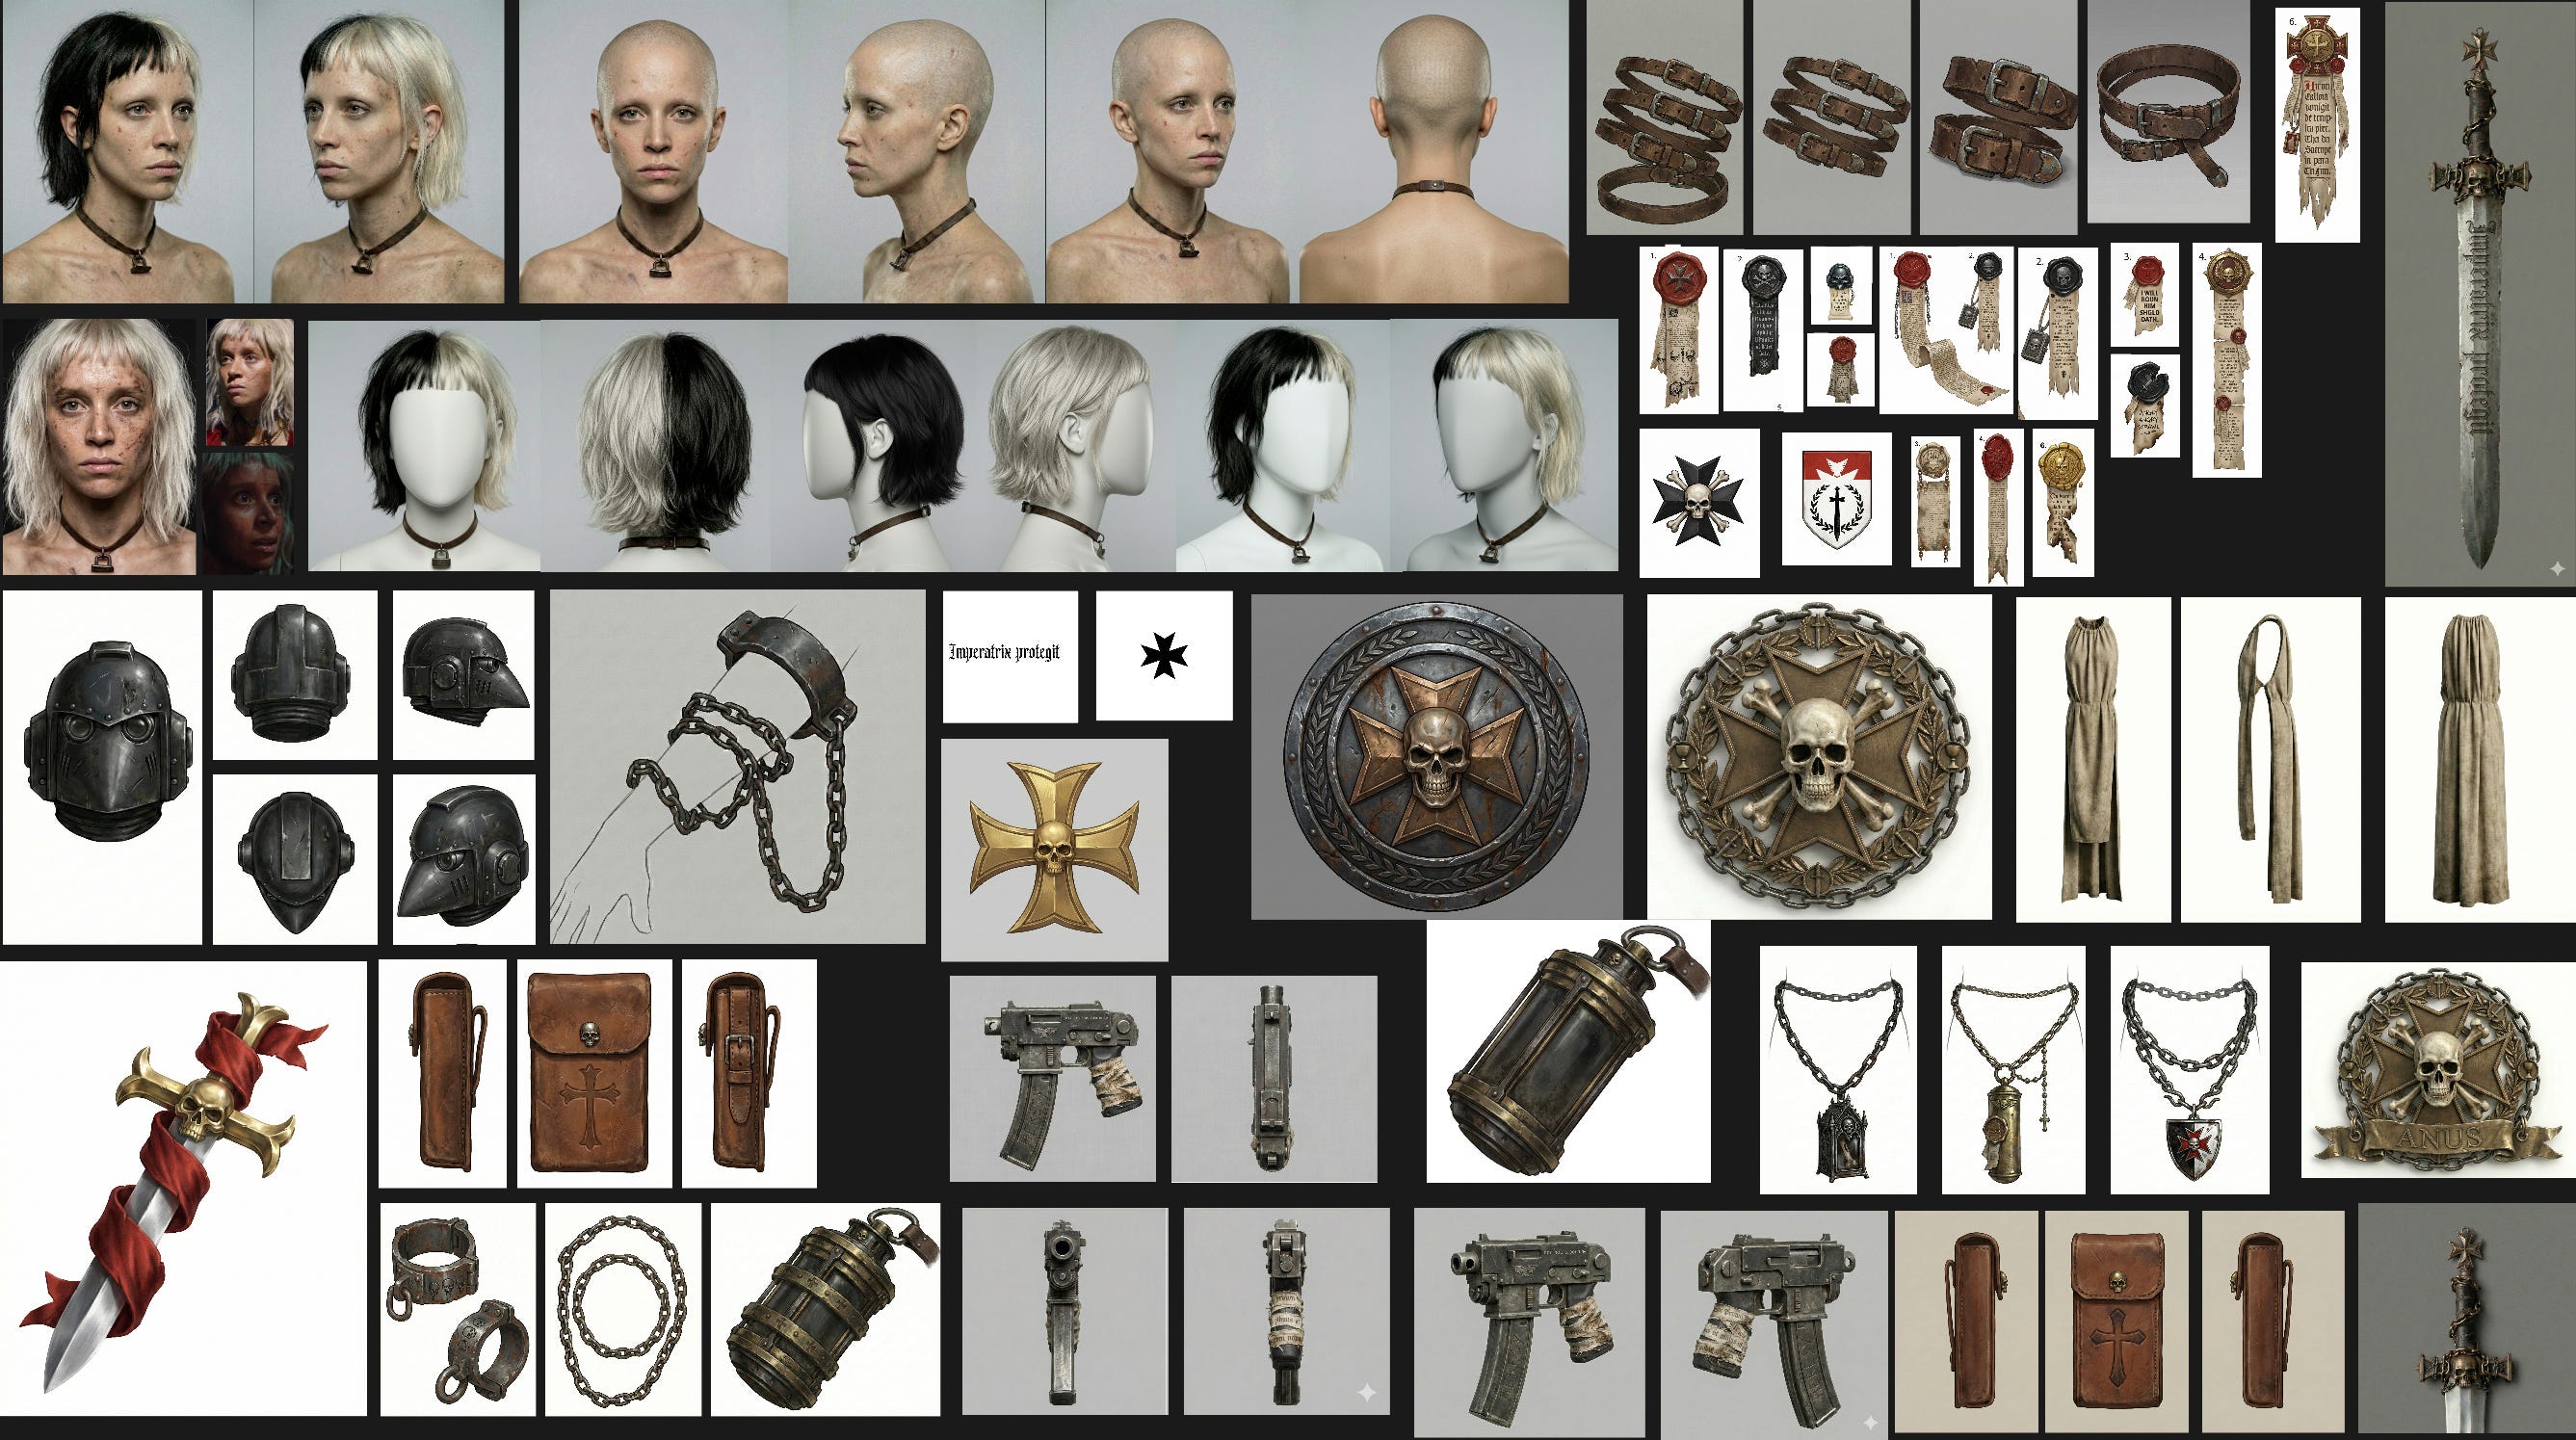
The third character was probably the clearest case study in time savings.

All those tribal ornaments are slow to build manually because they are organic forms that still have to be recreated cleanly in geometry. If this were a production-ready asset, the work would not stop there: it would also have to be subdivided, baked, and textured properly in a PBR pipeline. That is an absurd amount of labor for something like a necklace.
Traditionally, people solve this with kitbash libraries of reusable shapes, but that also creates visual repetition. The neural advantage here is obvious: each generation can be different, and the number of variants no longer matters. As long as you have concept direction, you can keep producing unique forms.
The fourth character, the Templaretta, pushed more toward hard-surface kitbash and gave me a chance to test generated cloth as well. I wanted to see if I could generate a fabric tunic instead of simulating one, and the results were surprisingly solid.
In general, the generators handled ornaments, chains, and the helmet well. The sword was still done in parts — hilt and blade separately. This character also had a lot of hanging elements, which became especially interesting once animated.
And that leads to another important point: physics setup for this kind of character is expensive. It takes real time, real iteration, and usually only happens in final production. Being able to preview that kind of visual behavior before a production-ready asset exists — weeks or months earlier — is extremely valuable for visual development.
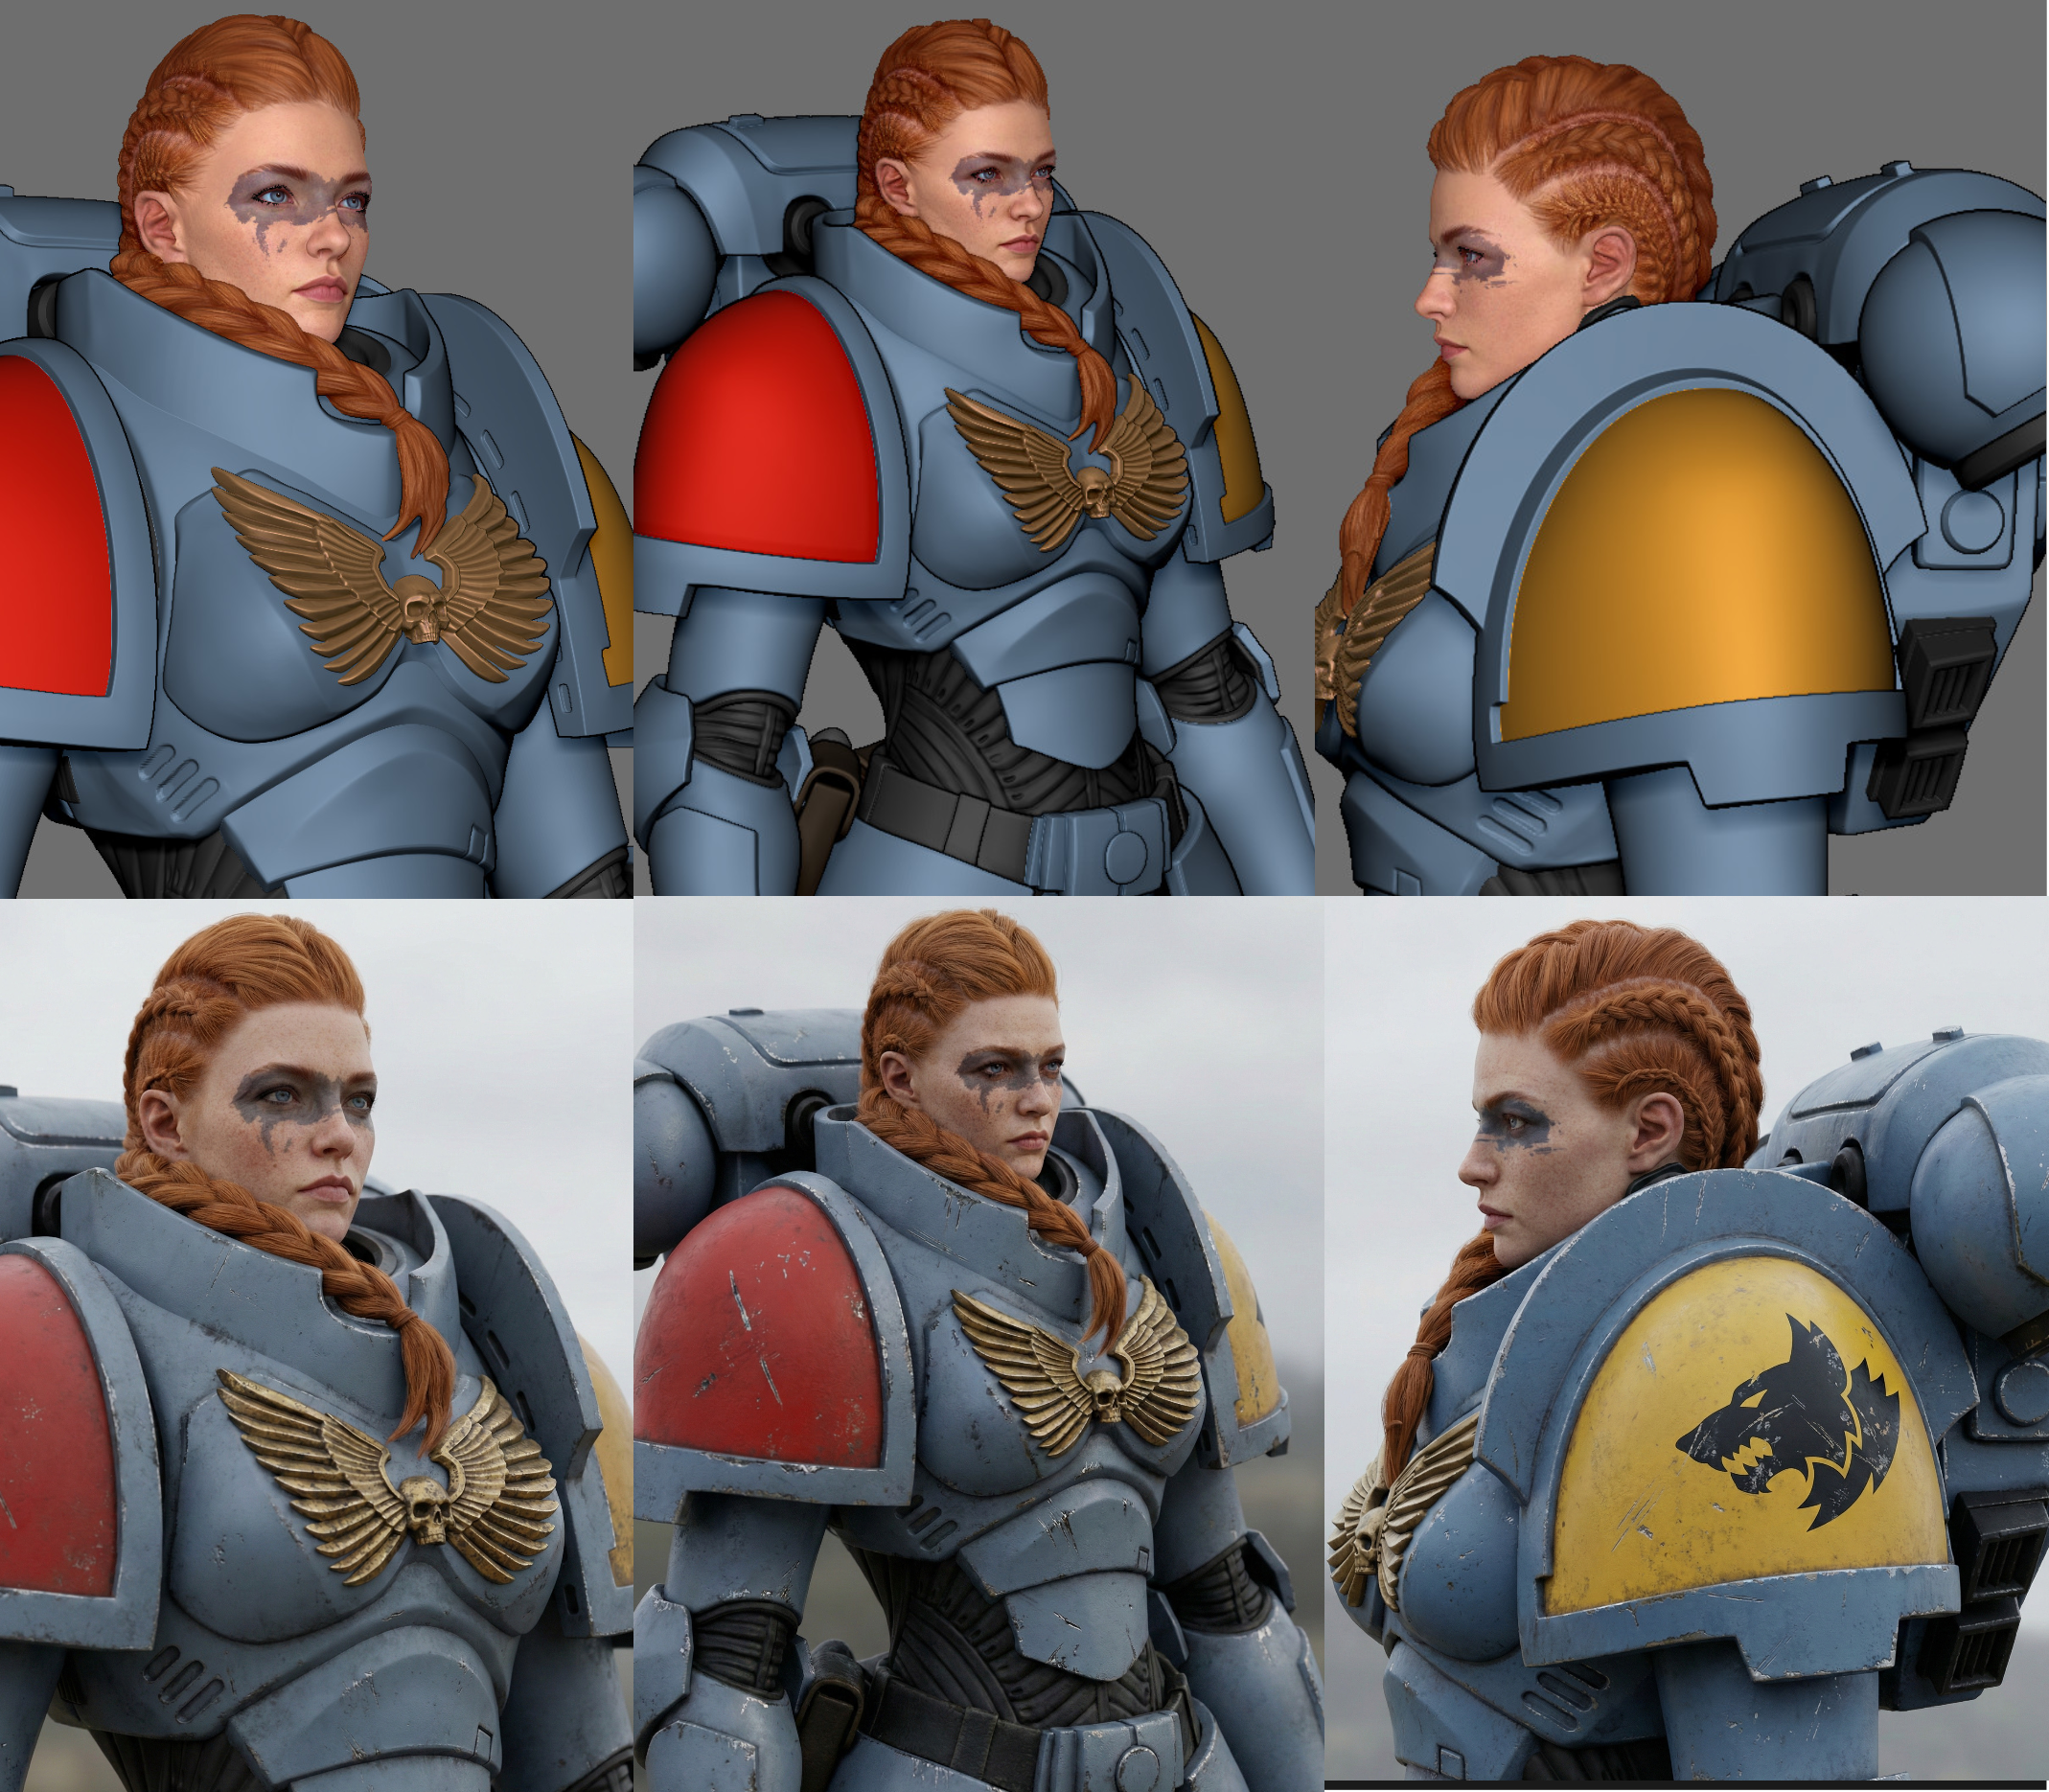
The fifth character was less dramatic as a case study, but it revealed another benefit: because earlier generations had already saved me so much effort, I could spend more time refining her proportions and face. That is an indirect gain people often overlook.
Also, I should say this plainly: generated gloves work very well. I have no intention of sculpting gloves from scratch ever again. Same goes for footwear.
Rendering and the Control Gradient
Rendering brought me back to the same issue I mentioned earlier: control versus freedom.
The same rules apply to Banana. You can feed it a very rough ZBrush screenshot with no proper lighting and almost no shadow information, and it will still read the form correctly and apply photoreal treatment with considerable artistic freedom.
On the other hand, if you give it a beautifully lit cinematic-quality Marmoset render, the model has much less room to improvise. At that point it mostly adds scratches, secondary surface detail, and lighting variations. It becomes much more restrained.
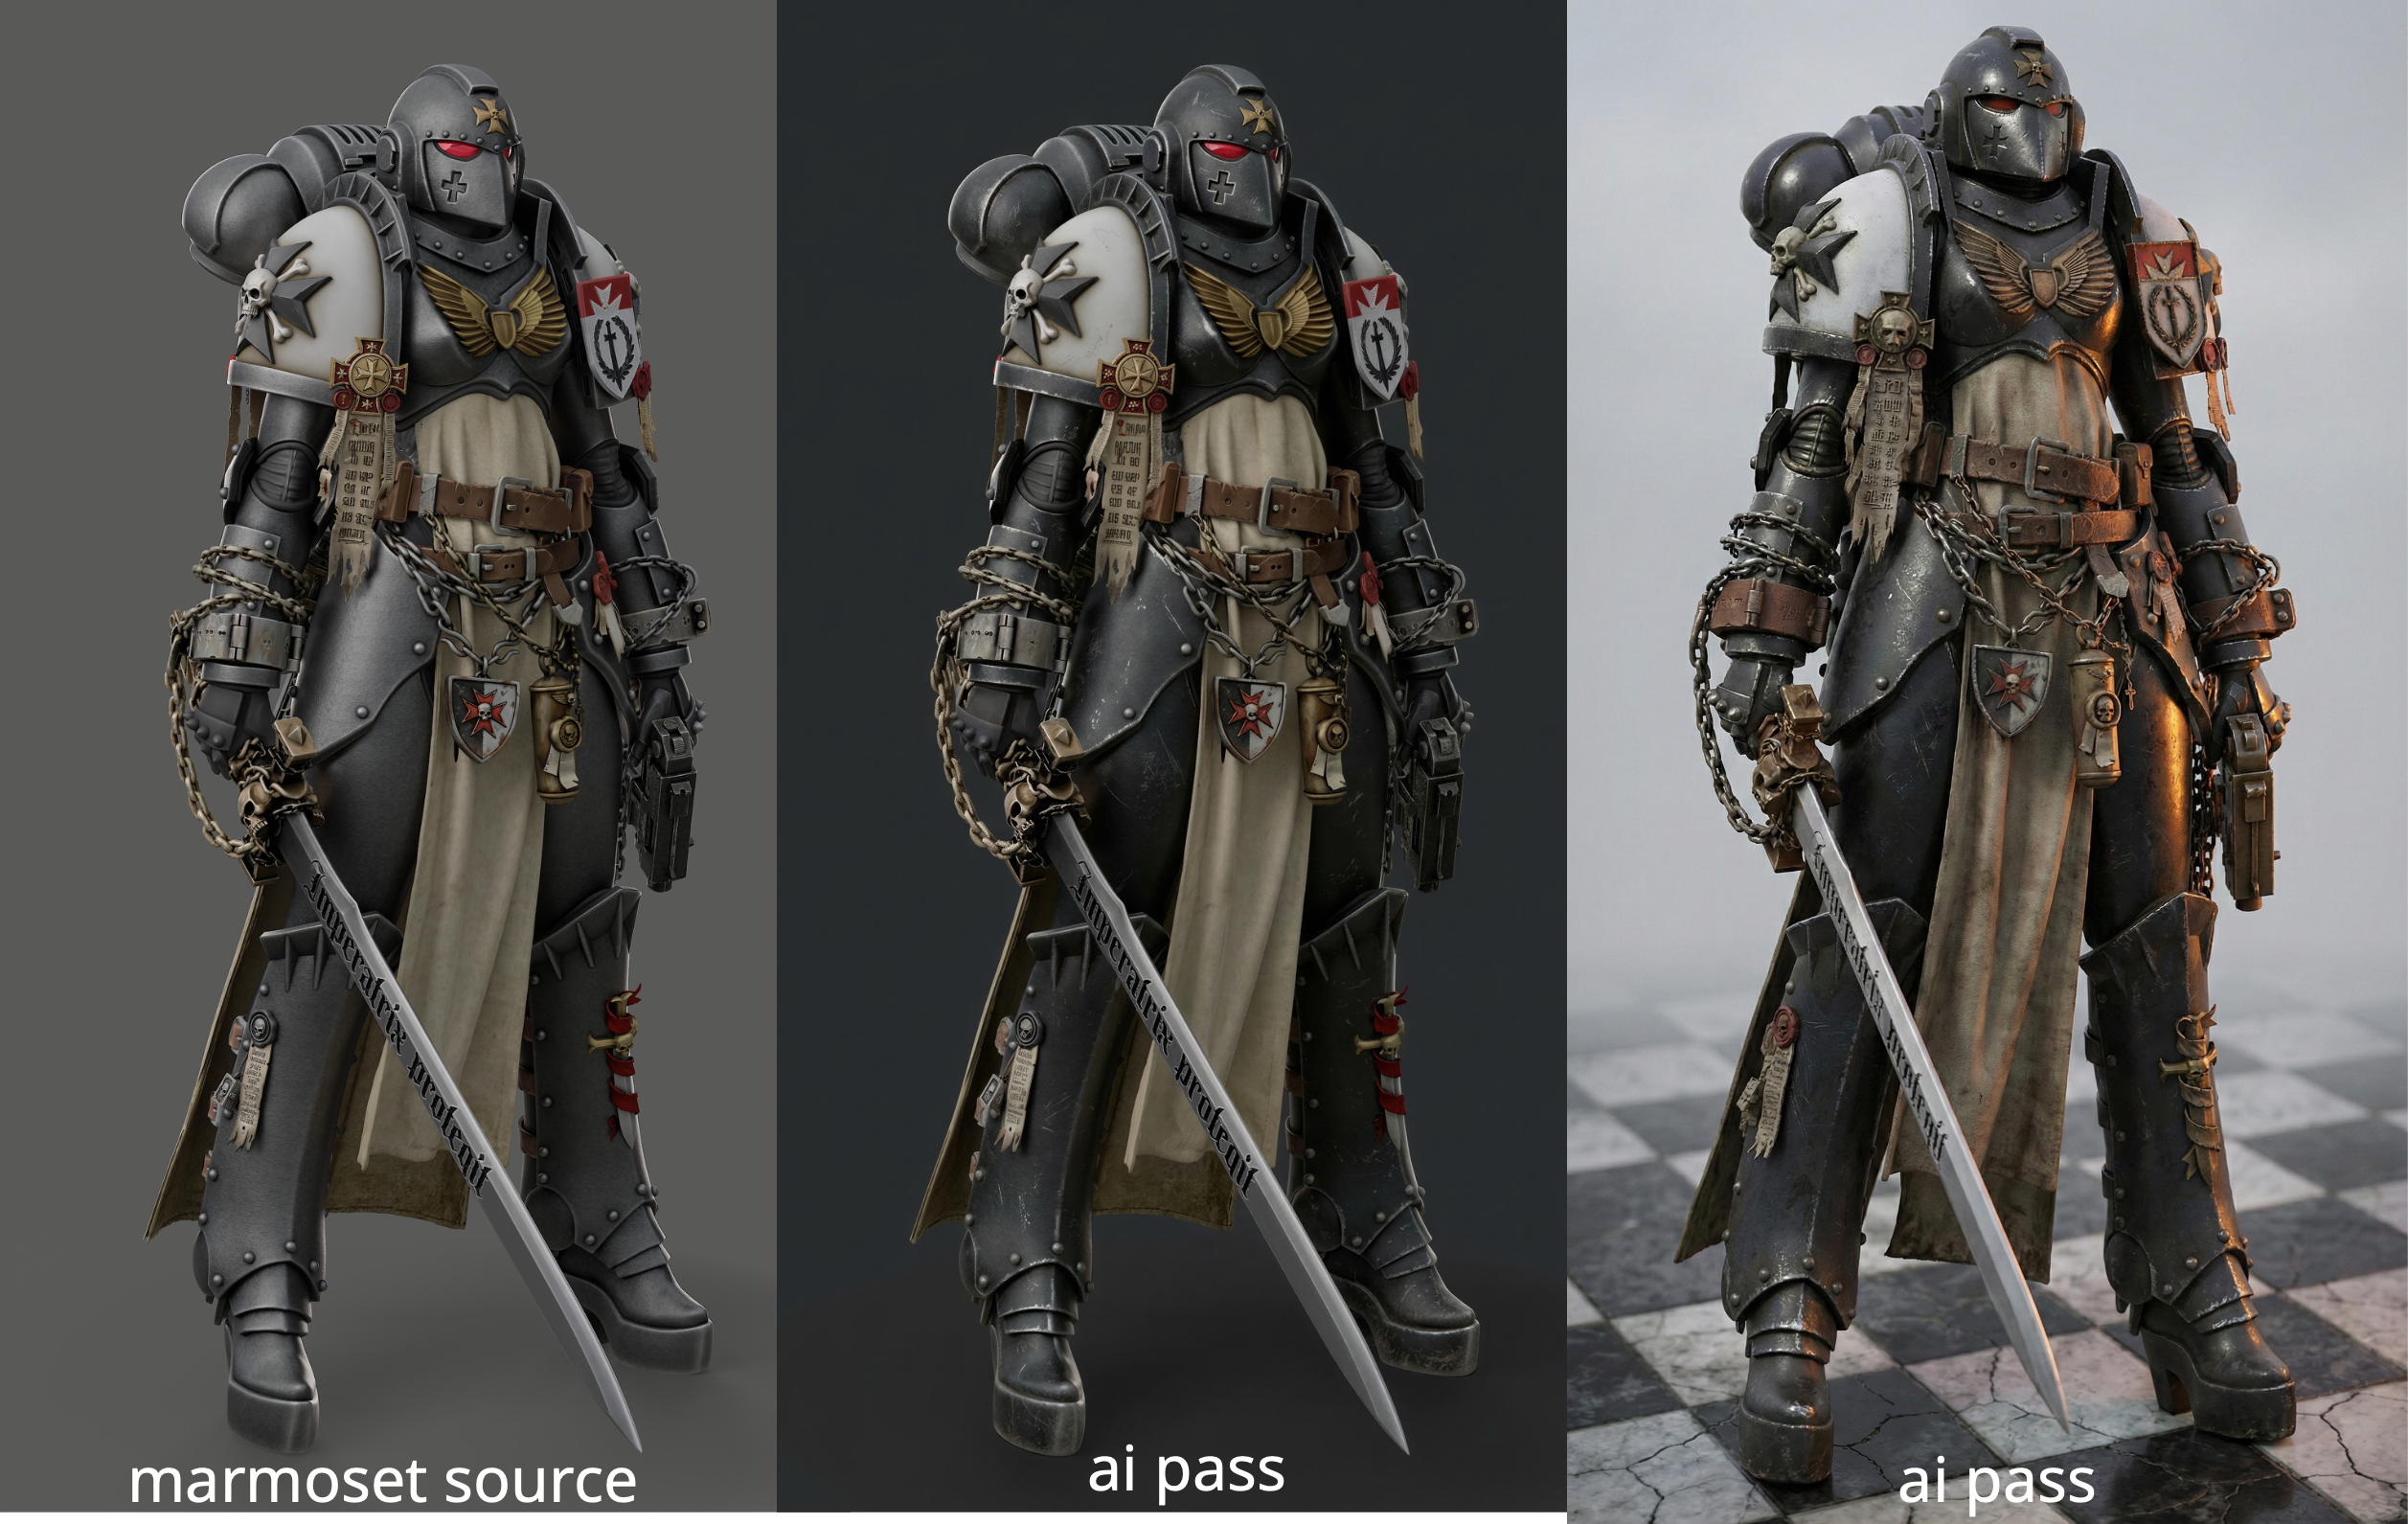
That is why finding the balance between input quality and control is a never-ending quest for anyone working seriously with neural tools.
Too little information, and the model invents too much. Too much information, and the model becomes timid.
The sweet spot is always moving.
Why I Used Gemini, and Why I’m Moving to Vizcom
I rendered almost everything inside the Gemini interface.
It is not the most elegant setup, but it worked well for me because it preserved project context. Gemini also helped with brainstorming ideas for chapters, factions, and equipment. I kept the chats clean and focused, which mattered a lot. By the end, Gemini understood what I wanted almost intuitively and was producing very strong concept refinements from very little guidance.
The main problem was reliability. Gemini’s backend breaks often. Chats glitch out, generation quality degrades, and eventually you end up opening new chats just to keep working until those break too.
Because of that, I’m moving toward Vizcom now.
It is expensive, but it is extremely convenient for working with Nano Banana and has started to replace Photoshop for me, especially now that Photoshop has become increasingly overpriced for what it offers. Vizcom has been far more stable, faster in practice, and generates four images at once.
What I Actually Got Out of 30 Hours
So what did I get in the end, besides an interesting experiment and a better understanding of where these workflows are heading?
For roughly 30 hours of work, I ended up with five fairly distinct characters in the form of 3D models and AI renders. That opens up several obvious possibilities.
They could be posed and turned into printable miniatures. For obvious reasons, I will not be doing that.
They could be handed off into production, where the job would mostly consist of cleanup and retopology rather than redesign. Their proportions, materials, colors, and visual identity are already established.
They can be animated with AI, which opens up an enormous range of possible pipelines and use cases.
But the most interesting application, in my view, is something else entirely: long-term character preservation.
One of the things that has always bothered me about 3D is how badly 3D assets age. Try opening and reusing something made 5, 10, or 15 years ago and you will see exactly what I mean. There is no single enduring standard. Software changes, renderers change, polygon budgets change, shading systems change, rigs break, formats drift.
Against that background, the idea of storing character information in the form of high-quality renders — whether traditional 3D renders or AI-enhanced renders — starts to look extremely promising.
With the arrival of neural tools, the image has become the simplest and most universal container for visual information. It is also the most plastic. You can upscale it, restyle it, relight it, reinterpret it, and repurpose it cheaply.
And that, to me, is one of the most important shifts happening right now.
If you already have a high-quality visual source for a complex character design, and that design remains consistent through multiple manipulations, then the image stops being just an output. It becomes a durable production asset in its own right.
That is the real point of this experiment.
Not just making cool renders.
Not just saving time.
But testing a future in which 3D defines the structure, AI accelerates the finish, and the final image becomes a stable, reusable carrier of character information.